How to install adb drivers on windows
Содержание:
- Examples of ADB Commands
- Как включить отладку по USB на Android
- Steps to install ADB Installer on Windows OS
- How to Install Fastboot and ADB on Windows
- Fourth Step: Open Device Manager and Install the ADB Driver
- How to install ADB Drivers on Windows OS
- What is the PATH system variable?
- Adding adb and Fastboot to the Windows PATH (Method 2)
- Install ADB on Windows 10
- Установка ADB
- How to Setup ADB/Fastboot on Windows
- Testing System-wide ADB
- Install ADB and Fastboot tool on Windows 10
- Проверка работы ADB и Fastboot
- How to setup ADB on macOS
- Install Android Bootloader Interface through Windows update
- FAQs
- What is ADB?
- How to Install ADB Drivers of Android device:
- ADB Shell
Examples of ADB Commands
To check if you have successfully installed ADB, connect your device to your PC/Mac with your USB cable, and run the command as described above. It should display your device listed in the Command Prompt/PowerShell/Terminal window. If you get a different output, we recommend starting over with the steps.
As mentioned above, you can use ADB to do all sorts of things on an Android device. Some of these commands are built directly into the ADB binary and should work on all devices. You can also open up what is referred to as an ADB Shell and this will let you run commands directly on the device. The commands which are run directly on the device can vary from device to device (since OEMs can remove access to certain ones, and also modify adb behavior) and can vary from one version of Android to the next as well.
Below, you’ll find a list of example commands which you can do on your device:
- Print a list of connected devices:
- Kill the ADB server:
- Install an application:
- Set up port forwarding:
- Copy a file/directory from the device:
- Copy a file/directory to the device:
- Initiate an ADB shell:
Bonus
For those who want to take this a step further, you can follow this new tutorial we put together that will walk you through how to set up ADB so that you can use the command from any directory on a Windows or Linux desktop.
Как включить отладку по USB на Android
Отладка по USB включается в настройках системы в разделе Параметры разработчика.
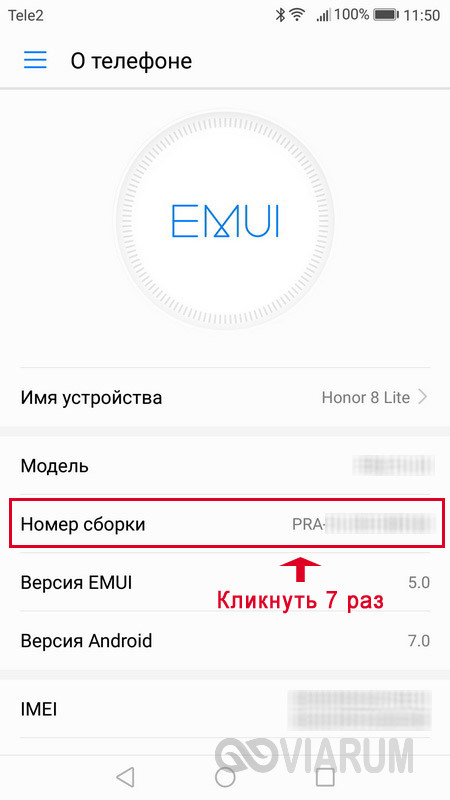
На Android 4.2 и выше раздел параметров разработчика по умолчанию скрыт. Чтобы сделать его видимым, перейдите в Настройки – О телефоне и нажмите Номер сборки (в редких случаях Номер модели) 7 раз (в редких случаях 10). На экране отобразится уведомление «Теперь вы разработчик!«
В настройках должен появиться пункт меню Параметры разработчика, найдите в нем пункт Отладка USB и активируйте его.
На некоторых устройствах раздел с параметрами разработчика может располагаться в других разделах настроек или иметь другое название.
Подробнее о параметрах разработчика на устройствах Android можно ознакомится на .
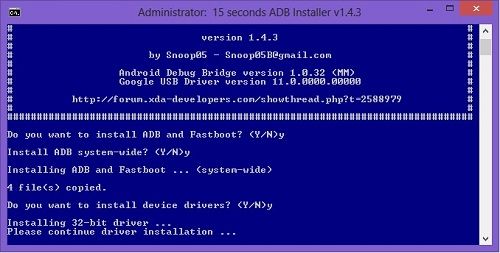
Steps to install ADB Installer on Windows OS
- Download and Extract 15 seconds ADB Installer on your computer.
- Right-click and Run it as Administrator.
- As you launch it, a blue screen will appear.
- It’ll ask to install ADB and Fastboot. So type Y from your keyboard and press the enter key to continue.
- As your press enter, it’ll ask to install Android ADB driver System-wide which contains the fast boot files.
- So again type Y from your keyboard and press the enter key to continue.
- As your press the enter key, the installation will begin.
- Just within few seconds 4 files will be copied.
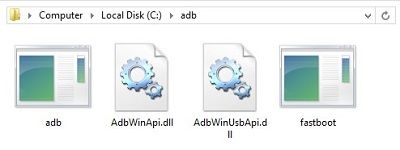
- These files are ADB, AdbWinApi.dll, AdbWinUsbApi.dll, and fast boot.
- Moreover, it’ll ask whether to install device drivers or not.
- So type Y and press the enter key to continue.
- Depending upon your PC configuration, it’ll start the installation of 32-bit or 64-bit drivers.
Now the Device Driver installation wizard will popup.
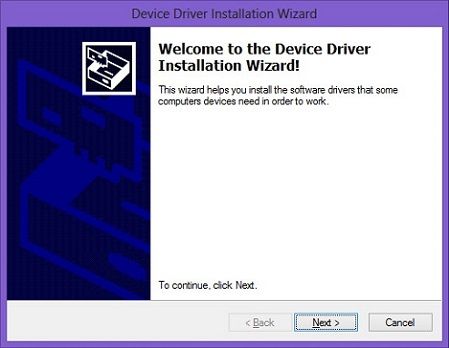
- Furthermore, press Next to initiate the Device driver installation.
- Be patient and wait until it completes.
- Within a few seconds, the latest drivers will be successfully installed on your computer.
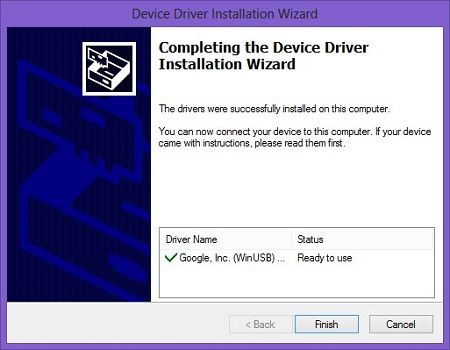
- Click on Finish to close the device driver installation wizard.
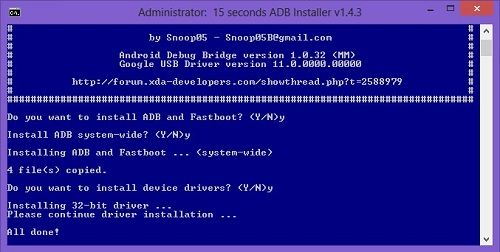
- The blue screen will show a message of All done, thus confirming the successful installation of ADB and fast boot drivers.
To verify the installation of ADB and Fastboot files, go to Local Disk (C:) » ADB. You’ll see these four files there.
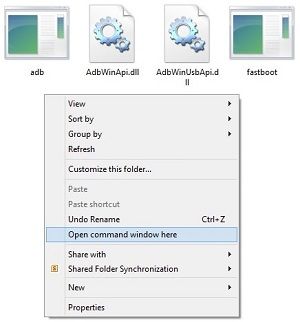
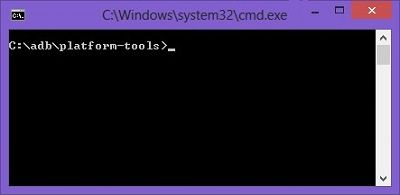
Now hold the Shift button and right mouse click anywhere in that folder. You’ll see a list of options. Just select the Open command window here option. This will launch the command prompt window as given below.
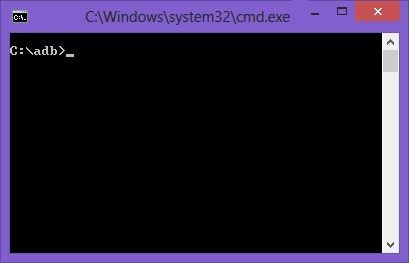
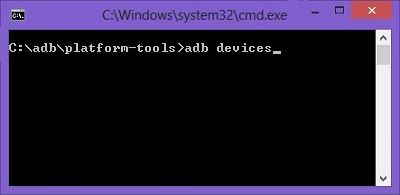
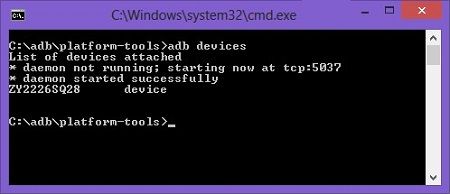
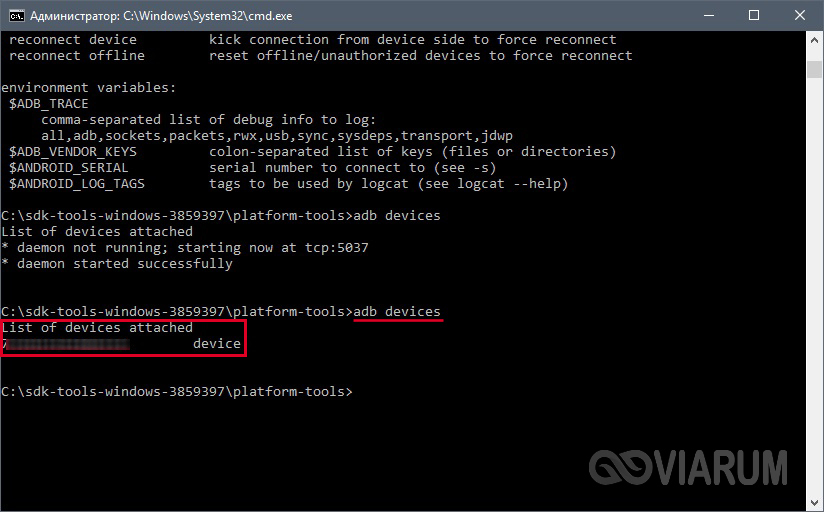
To confirm the proper installation of ADB drivers, type the following command and press the enter key.
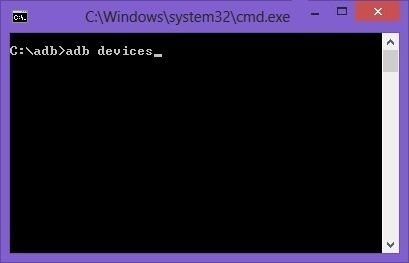
As soon as you press the enter key, you’ll see a message saying ‘List of devices attached’ along with some random numbers. This will confirm the successful connection of your device with a computer using ADB drivers.

Note: If such a thing doesn’t happen, then install USB drivers, enable USB debugging mode, and try again. If the problem persists, try changing the USB cable or even the USB port.
How to Solve USB Device Not Recognized Error
How to Install Fastboot and ADB on Windows
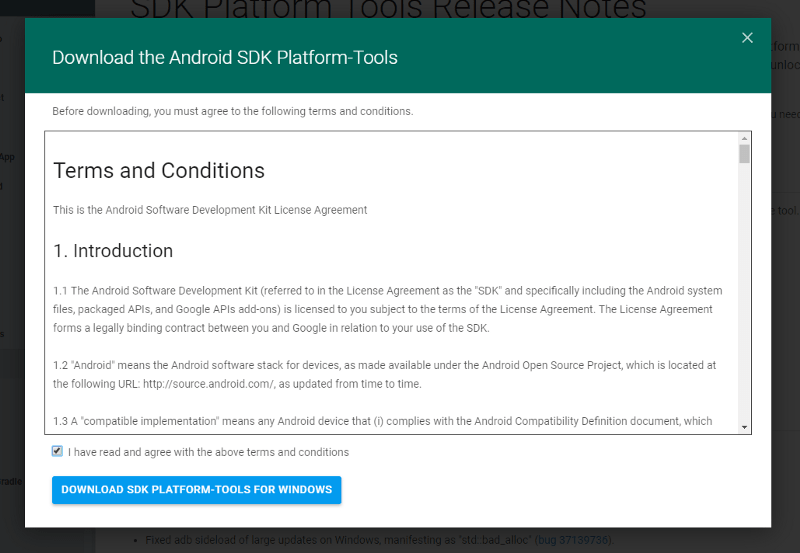
For this tutorial, we will use the official ADB and Fastboot binaries provided by Google as part of the Android SDK Platform-Tools package (also mentioned above).
We recommend going through the entire tutorial below once before actually performing it on your computer. This way you will have all the necessary files downloaded with you from before.
Instructions:
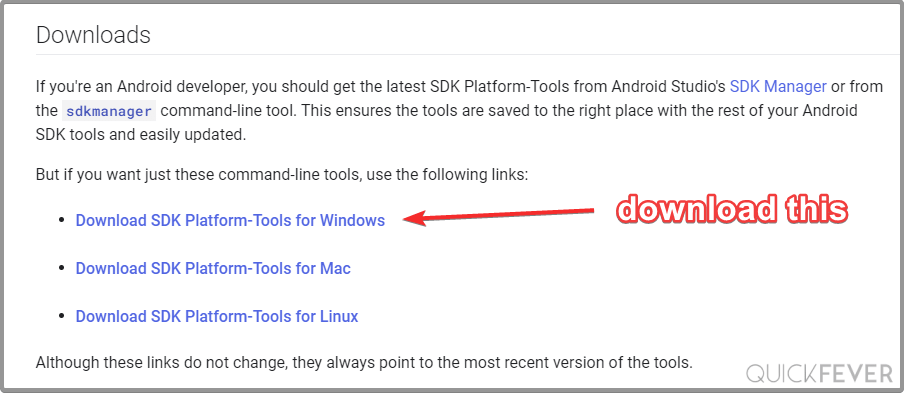
Step 1 – Download Android SDK Platform-Tools. This ZIP file contains the ADB and Fastboot tool files. You can download the Windows version from the direct below below:
Download Platform Tools for Windows: platform-tools-latest-windows.zip
Step 2 – Extract the Platform-Tools ZIP to a location which you can easily access and remember. We extracted it on our Desktop.

Step 3 – Now, in order to use these tools, you should open a Command Prompt instance with Administrator privileges and then change its working directory to the one where you extracted the tools. To do that, issue the following command (remember to replace the quoted words):
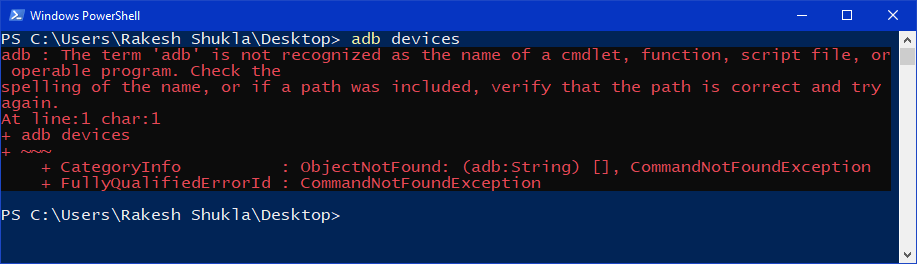
NOTE: Windows PowerShell is different from Command Prompt. If you want to use PowerShell with these tools, you need to add “./” before any command to set its precedence. Rest will remain the same.
You will get something like shown in the screenshot below.

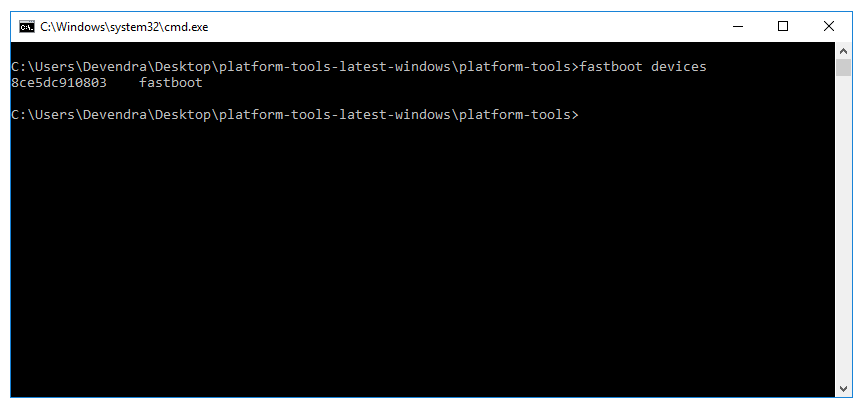
Step 4 – To check whether ADB / Fastboot on Windows is now recognizing your Android device, run the following command AFTER connecting your phone with the computer
NOTE: Connect your Android device with your computer using a USB cable. The device should be ON in order to use ADB commands on it.
You should get a similar response as seen in the screenshot below.

That’s it! You can now utilize ADB and Fastboot utilities by simply opening up a command window in the directory of extracted Platform-Tools and then executing the desired commands. You need to be in the Platform-Tools directory for the command prompt to recognize the ADB and Fastboot tools.
Fourth Step: Open Device Manager and Install the ADB Driver
You can open Device Manager to install the ADB driver. In this article, we are going to use Google Nexus 7 because the steps are quite similar for all other Android devices. Once you’re ready, just follow the instructions below:
- Plug your Android device into your computer.
- Open the Run dialog box by pressing Windows Key+R on your keyboard.
- Type “devmgmt.msc” (no quotes), then hit Enter. This should bring up Device Manager.
- Look for your Android device.
- Right-click it, then select Properties from the options. If the driver is not installed properly, you will see a yellow warning icon beside your Android device.
- Go to the Driver tab, then click Update Driver.
- A new window will pop up. Select the ‘Browse my computer for driver software’ option.
- Search for the ADB driver file you previously downloaded by clicking Browse.
- Select the box beside Include Subfolders, then click Next. Device Manager will automatically install the ADB driver.
If you do not need this feature, you might ask, “Where can I uninstall the ADB driver?” You can do that via Device Manager. You just need to follow the first four steps, then select Uninstall Device.
Resolve PC Issues with Driver Updater
Unstable PC performance is often caused by outdated or corrupt drivers. Auslogics Driver Updater diagnoses driver issues and lets you update old drivers all at once or one at a time to get your PC running smoother
Auslogics Driver Updater is a product of Auslogics, certified Microsoft Silver Application Developer
DOWNLOAD NOW
So, if you do not have the patience and tech skills to manually update your drivers, we recommend that you use Auslogics Driver Updater. Once you activate this program, it will automatically identify what system version you have. That said, Auslogics Driver Updater will locate the latest manufacturer-recommended drivers that are compatible with your system.
Where do you plan on using the ADB?
How to install ADB Drivers on Windows OS
Read the instructions given below to manually install ADB and Fastboot drivers on Windows XP, Windows Vista, Windows 7, Windows 8/8.1, Windows 10 32-bit, or 64-bit operating system. If you face any problem, then confirm the latest mobile drivers are installed on your computer or not.
Requirements
- Ensure to connect your Android device to your PC via USB cable.
- Also enable USB debugging mode on your phone.
- Moreover, install the latest USB drivers on your PC.
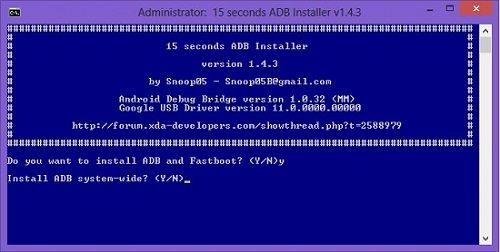
Method 1: Using 15 seconds ADB Installer
Developed by Snoop05, this is an all-in-one ADB installer tool for Android. As its name suggests, this tool installs ADB, Fastboot, and Google drivers on your computer within 15 seconds. All you need to do is launch this tool on your PC and follow the instructions given.
15 seconds ADB Installer
Steps to install ADB Drivers
- Download and extract 15 seconds ADB Installer on your PC.
- Launch the 15 seconds ADB Installer.
- To install ADB and Fastboot, type Y and press the enter key.
- Then to install ADB System-wide, again type Y and press enter.
- Now it’ll ask to install device drivers. Again type Y and press enter.
- This will launch the Device driver installation wizard. Press next to install the device drivers.
- That’s it! You’ve successfully installed ADB drivers using 15 seconds ADB Installer.
Method 2: Using Minimal ADB and Fastboot Setup wizard
Shimp208, a recognized contributor from XDA developers has compiled this setup wizard. Its main purpose is to install ADB drivers without having to enter any keys like in the previous method. Besides, the total installation of Minimal ADB and Fastboot is around 2 MB in size, thus making it very lightweight.
Minimal ADB and Fastboot
Steps to install ADB Drivers
- Download and Extract Minimal ADB and Fastboot Tool on your PC.
- Launch it by giving Administrator privileges.
- The installation Setup wizard will open as given below.
- Read out the instructions and click Next to continue.
- Furthermore, click on the Install option to begin the installation process.
- As soon as you click on Install, the Minimal ADB and Fastboot installation process will start.
- Finally, the Minimal ADB and Fastboot drivers will be successfully installed on your computer.
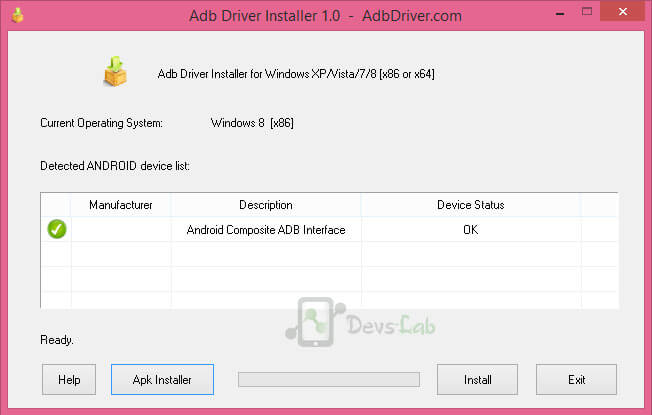
Method 3: Using ADB Driver Installer
ADB Driver Installer provides Universal Android ADB USB compatible drivers for Windows operating system.
Steps to install ADB Drivers
- Download and Extract ADB Driver Installer on your computer.
- Then right-click and run it as Administrator.
- Ensure that your Android device is connected to a PC with USB debugging enabled.
- As soon as you launch the ADB Driver Installer, the following screen will appear:
- The device status shows that the drivers are incorrectly installed. So we need to fix this.
- For that click on the Install option. This will begin the installation of ADB and Fastboot drivers on your PC.
If you are prompted Windows can’t verify the publisher of this driver software, select the Install this driver software anyway option.

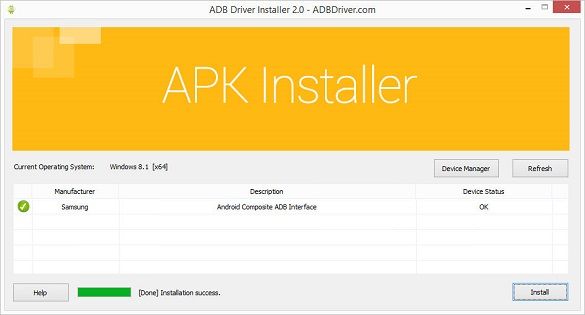
- This will start the installation of the Universal Android USB driver.
- Finally, the installation will complete a successful message.
Steps to install ADB Drivers
- Download and Extract the SDK Platform-tools zip file on your PC.
- After extraction, you’ll see a folder named Platform tools.
- Move this folder to an easily accessible folder such as C:\adb.
- In that folder, open a cmd window.
- For doing so, hold the Shift button and right mouse click anywhere in that folder. You’ll see a list of options from which click on the Open command window here option. This will launch the command prompt window as given below.

To confirm the proper installation of ADB drivers, type the following command, and press the enter key.
- As soon as you press the enter key, you’ll see a message saying ‘List of devices attached’ along with some random numbers.
- Moreover, this will confirm the successful connection of your device with the PC using ADB drivers.
Note: If such a thing doesn’t happen, then install USB drivers, enable USB debugging mode, and try again. If the problem persists, change the USB cable or the USB port.
What is the PATH system variable?
PATH is used by Windows to specify the location of important executables. Usually, these are files located in the system directories, such as C:\Windows and C:\Windows\system32. This is why you can type “calc” in the command prompt to launch calculator, but not “chrome” to launch Google Chrome. This variable is sometimes changed by applications when you install them, such as Java. Java adds itself to the PATH variable on installation, meaning you can use Java from any directory. This is useful to people using Java applications so the program does not have to attempt to hard code the Java location.
We will be modifying the PATH system variable to allow us to use adb or Fastboot anywhere on our Windows computer. PATH also exists on Linux and usually contains the bin and sbin directories. I will cover how to add the platform tools to the Linux PATH variable too.
Note: Both tutorials require administrator/sudo access. Adding to Windows has two methods. I strongly suggest the first, but both work fine and the second is better if you plan to use the PATH variable a lot.
Adding adb and Fastboot to the Windows PATH (Method 2)
Step 1
Open Windows Explorer and right click “My PC”. Select “Properties” and you will be greeted with a screen showing some system information.

Select “Advanced System Settings”.

Select “Environment Variables”

Look for the variable named “Path” and double click it.

Step 5
Click “Browse” and navigate to the folder where you extracted your adb files. Next “okay” out of all of the Windows you have open. Start a new PowerShell or command prompt and type “adb” to verify the location has been added. If not, reboot your PC and try again.
Please ensure before you click “Browse” that no field is highlighted. If a field is highlighted you will end up replacing it. Click somewhere in the list that doesn’t contain an entry to ensure that you do not replace a field.

Install ADB on Windows 10
Note: the same procedure is applicable for older versions of Windows like 7 and 8.
1. To start off, download ADB for Windows from the official Google website.
2. Create a new folder with the name “ADB” in the root of the C drive. Now, extract all the files in the downloaded ZIP file to the folder you just created. This is how it looks like when you are done extracting.

3. Grab a USB data cable and connect your android device to the Windows computer. If prompted, select “file transfer (MTP)” mode.
4. Now, search for “Command Prompt” in the start menu and open it.
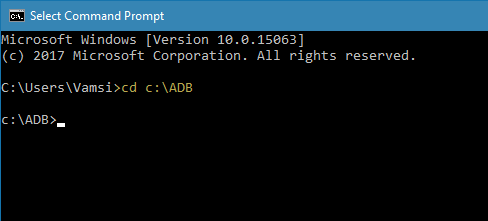
5. In the command prompt, use the below command to navigate the ADB installation folder. If you’ve installed ADB folder in some other place then change the command accordingly.
cd c:\ADB
6. Once you are here, execute the following command ADB Daemon.
adb devices
7. As soon as you execute the command, you will see “Allow USB debugging” prompt on your android device screen. Tap on the “Ok” button. Now, your device will be listed in the command prompt.
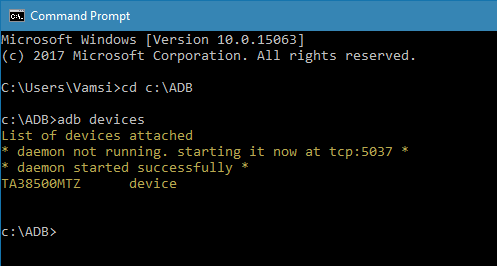
If you see your device listed then you’ve successfully installed ADB on Windows 10. If not, make sure that the device is properly connected and you have installed android drives on Windows. Generally, you can download android drivers specific to your device on the manufacturer website.
Related: How to Use Multiple Facebook Accounts on Android
Установка ADB
На устройствах под управлением Windows, установите драйвер для вашего Android-устройства.
Если драйвера для вашего устройства не нашлось на указанных страницах, попробуйте поискать его на сайте производителя.
Для MacOS и Linux установка драйверов не требуется.
Далее потребуется установить Android SDK Platform Tools. Если вы используете , скорее всего SDK Platform Tools у вас уже установлен.
Установка ADB в Windows
Скачайте и распакуйте папку platform-tools на диск (рекомендуется в С:\platform-tools).
В системную переменную Path добавьте путь к распакованной папке, для этого:
- перейдите в Панель управления – Система и безопасность – Система;
- выберите пункт Дополнительные параметры системы;
- нажмите кнопку Переменные среды;
- в поле Системные переменные выберите значение Path и нажмите кнопку Изменить, чтобы добавить новое значение;
- укажите путь к папке platform-tools содержащую adb;
- перезагрузите компьютер.
Установка ADB в Linux
Чтобы установить SDK Platform Tools в Ubuntu выполните следующую команду.
или
Либо вручную скачать , распаковать на диск и добавить путь к распакованной папке с platform-tools в переменную среды $PATH.
Установка ADB в MacOS
Самый простой способ установить SDK Platform Tools на MacOS, используя Homebrew.
Либо установить вручную.
Сперва удалите предыдущую версию android-platform-tools, если такая имеется.
Затем скачайте .
Перейдите в папку с загрузками, распакуйте скачанный архив и переместите файлы программы в удобное для вас место, например в домашнюю директорию.
Добавить путь к platform-tools в переменную среды $PATH.
Обновите bash профиль или перезапустите терминал.
Проверка ADB
Зайдите в консоль и введите следующую команду:
Если все сделали верно, в ответ в консоль будет выведена информация о версии ADB.
How to Setup ADB/Fastboot on Windows
I. Download and Install ADB & Fastboot
So, back in the day, you would need to download the entire Android SDK to get ADB and Fastboot to work, but thanks to some clever developers out there, you can get away with just downloading minimal versions that only setup ADB and Fastboot and leave the rest of the SDK out, for, you know, real developers.
1. Head to this developer’s page on XDA and download the 15 Second ADB Installer (download link in the first post, download whichever one he says is stable).
2. Right click the exe that downloads and select Run As Administrator.
3. When it opens, hit y and enter for each of the questions as it guides you through. (This will install ADB system wide so any user of the computer can access it and also install the drivers, which is a huge help as it can be the hardest part of all this to get to work).
4. When it’s all done, restart the computer to ensure they were installed.
5. On your phone, go to Settings > About Phone and continually tap on Build Number until it tells you you are a developer.
6. Hit Back.
7. Go to Developer Options and turn on USB Debugging.
8. Plug your device in via USB cable and wait for it to install drivers.
9. Now, on the PC, Open File Explorer and head to C: then adb and hold shift on your keyboard and right-click in a blank spot anywhere inside the folder (inside that folder you should see adb and fastboot along with a couple other files) and select Open Command Window Here.
10. Type the following into the command prompt window (hitting enter at the end of every line):
adb devices
11. If it’s a newer Android phone, a popup asking to allow the RSA keys will show up. Check Always Allow and accept it.
After that, you should see a serial number pop up, it’s the serial number of your phone. This means you are all set!
If you do not see a serial number, then we need to reinstall the drivers manually in Section II below.
II. Troubleshooting Driver Issues
Sometimes the drivers don’t install correctly and need a little coaxing to get them to work properly. Here’s common ways to do that.
Manually Tell Windows About the Drivers
1. On your computer, use the search feature (either using the search charm on Windows 8 or the search bar at the bottom of the screen in Windows 10) and search for Device Manager and then open it.
2. In the device manager. you should see an exclamation point on an item (this indicates that the drivers didn’t install for that item). Right-click that item and select Update Driver Software
3. Then select “Browse My Computer…”
4. Then select “Let Me Pick from a List…”
5. Select Android Device > Android ADB Device.
Now, unplug and plug the device back in and run the adb devices command from step 13 above and see if you get a serial number this time. If so, you are all set.
Testing System-wide ADB
- Launch a Windows Command Prompt or open a PowerShell window on your desktop or any other screen. To do so perform a right-click on the mouse while holding the Shift key and select Open PowerShell window here from the right-click Context Menu. You can also use the Windows search feature to quickly access the Command Prompt.
- Now, connect your Android device to your PC. Don’t forget to enable USB debugging on your device otherwise, the ADB daemon won’t recognize or detect your phone.
- One more thing, as soon as you issue the ADB command, your Android device will prompt you to authorize ADB. Keep an eye on your phone’s screen and select Allow when asked.
- Type the following ADB command in the command window and press the Enter key. Allow USB debugging if prompted.
adb devices
- You’ll get a string of alphanumeric values representing the ID of the connected Android device as shown below.
Now that you can run ADB and Fastboot commands from any screen of your Windows PC, why don’t you start with uninstalling system apps on your Android device via ADB without root?
If you get the ‘ADB is not recognized error‘, it means you haven’t set up system-wide ADB and Fastboot on your Windows PC properly.
You might have made a mistake while following the steps to create the ADB and Fastboot directory path as a system variable. To fix the issue, follow this tutorial more carefully. If you still get the same error, let me know via comments.
Read Next: How to Change Android Device Name using ADB Command
Install ADB and Fastboot tool on Windows 10
Google made a relatively small package called “Platform-tools” that includes ADB and Fastboot along with some other utilities.
Step 1. Download Google SDK Tools for Windows 10
Google named Platform Tools package that includes Fastboot, ADB and other utilities. To download the Platform-tools package , These are the separate package for Windows, Linux, and Mac.
Choose an appropriate version of Platform tool, select terms and click on the big blue button to download.
Step 2. Run
Navigate to the Platform Tools folder, Right click and choose “open command prompt” from here. If you see Powershell option instead on the command prompt, use this guide.
To use ADB commands you must enable “USB Debugging” feature on your phone. Otherwise, it won’t work.
ADB commands Application
Pulling/pushing a file
Use “adb push filename /path” to send the file to the mobile device.
For starters, I used the “” command will display all the connected devices which are in fastboot mode. For example to enter in fastboot mode in a Xiaomi device you have to turn off the phone, start it pressing Power + Vol Down simultaneously.
Step 3. Optional, Modify Adb Path
- Open “Advanced system settings.”
- Click “View Advanced system settings.”
- Click the box that says “Environment Variables.”
- Under “System Variables” click on the variable named “Path.”
- Click “Edit…” and enter ADB folder location.
Проверка работы ADB и Fastboot
После установки приложений любым из приведенных способов необходимо удостовериться в корректности работы утилит. Для этого через командную строку заходим в папку с файлами adb и fastboot (команда cd C:\sdk-tools-windows-3859397\platform-tools или cd C:\Minimal ADB and Fastboot), а затем выполняем команду adb help. Она должна вывести версию установленного Android Debug Bridge и список команд ADB. Если вы видите примерно то же, что изображено на приведенном ниже скриншоте, значит все работает правильно.

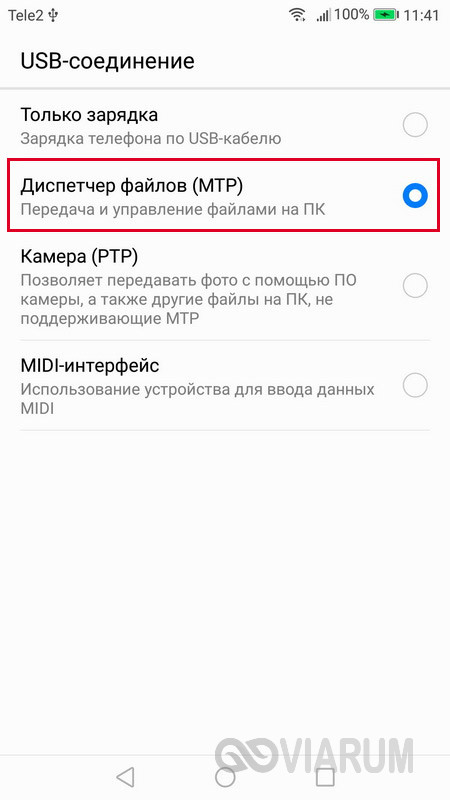
Теперь следует подключить к ПК мобильное устройство и проверить, увидит ли его приложение ADB. Подсоединяем телефон (или планшет) к компьютеру с помощью USB-кабеля, выставляем в настройках режим подключения MTP (обмен файлами) и заходим в раздел Настройки – Для разработчиков.
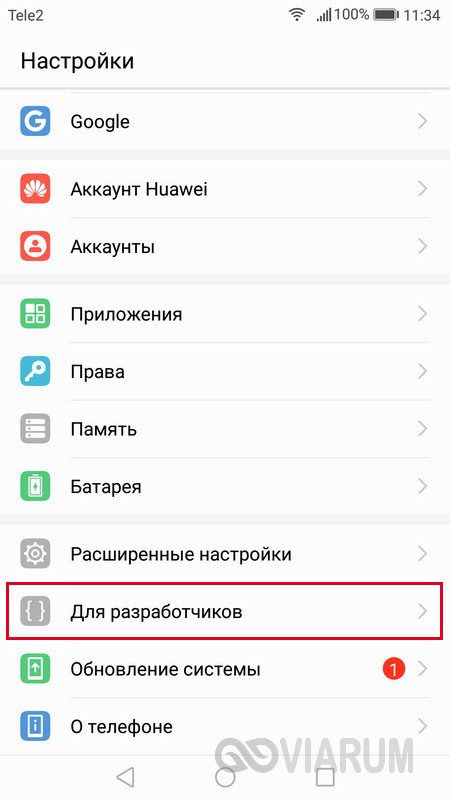
Если такого пункта в настройках нет, то переходим на страницу «О телефоне» и семь раз кликаем по строке с номером сборки.
Режим разработчика будет активирован, и раздел «Для разработчиков» станет доступным. Заходим в него и включаем опцию «Отладка по USB».

После всех этих манипуляций с гаджетом в командной строке Windows вводим команду adb devices. Она выведет информацию о подключенном устройстве примерно в таком формате, как на скриншоте.
Далее попробуем проверить, работает ли fastboot. Здесь же в консоли прописываем fastboot reboot и жмем Enter. Мобильное устройство должно перезагрузиться в обычном режиме.
Таким образом, мы протестировали ADB и Fastboot и убедились, что Android Debug Bridge нормально функционирует, а, значит, теперь можно управлять телефоном через компьютер.
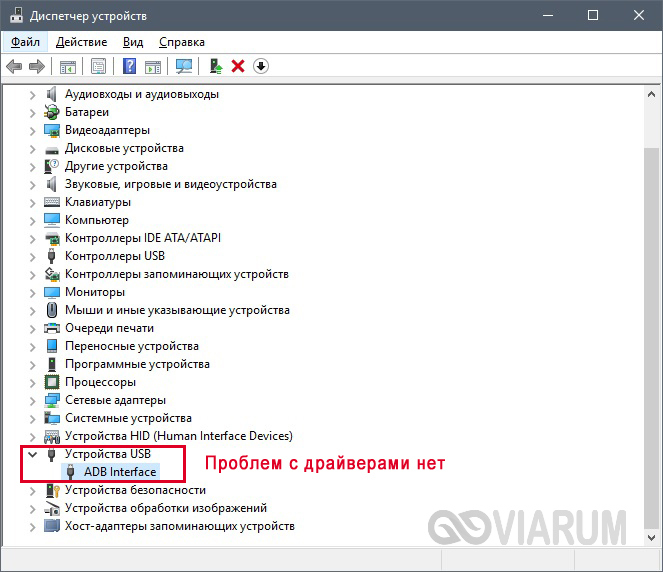
Если связь с устройством наладить не получается, то необходимо проверить наличие и корректность установки драйверов Андроид. Для этого при включенном режиме отладки заходим в «Диспетчер устройств» и смотрим, нет ли восклицательных знаков в ветке «Устройства USB» пункт «ADB Interface» (может называться немного по-другому).
Надеемся, что статья была для вас полезна.
How to setup ADB on macOS
- Download the Android SDK Platform Tools ZIP file for macOS.
- Extract the ZIP to an easily-accessible location (like the Desktop for example).
- Open Terminal.
- To browse to the folder you extracted ADB into, enter the following command:
- For example, on my Mac it was this:
- Connect your device to your Mac with a compatible USB cable. Change the USB connection mode to “file transfer (MTP)” mode. This is not always required for every device, but it’s best to just leave it in this mode so you don’t run into any issues.
- Once the Terminal is in the same folder your ADB tools are in, you can execute the following command to launch the ADB daemon:
- On your device, you’ll see an “Allow USB debugging” prompt. Allow the connection.
- Finally, re-enter the command from step #7. If everything was successful, you should now see your device’s serial number in macOS’s Terminal window.
Congratulations! You can now run any ADB command on your device! Now go forth and start modding your phone by following our extensive list of tutorials!
While the guide above will certainly work, some seasoned macOS users should be aware that there can be an easier way to install ADB on their Macs using an unofficial package manager such as Homebrew or MacPorts.
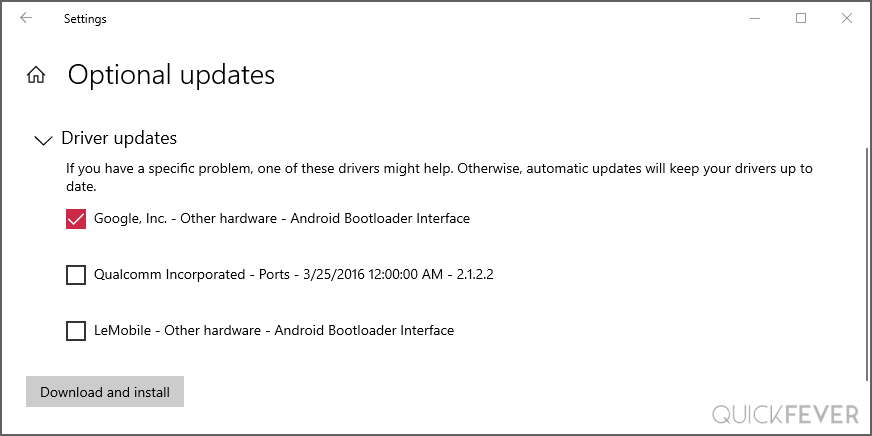
Install Android Bootloader Interface through Windows update
Starting with Windows version 20H2, Microsoft has quietly added it to Optional Updates. This means that you will have to go into the settings and install this software, which I am giving below in the steps and the steps are quite easy, you hardly need to face any problem in doing this from the office, for this you need an internet connection.
QUIckly open Windows settings and then Windows Updates (find under Update and security). Under the Check for update button you can see optional updates button right beneath it.
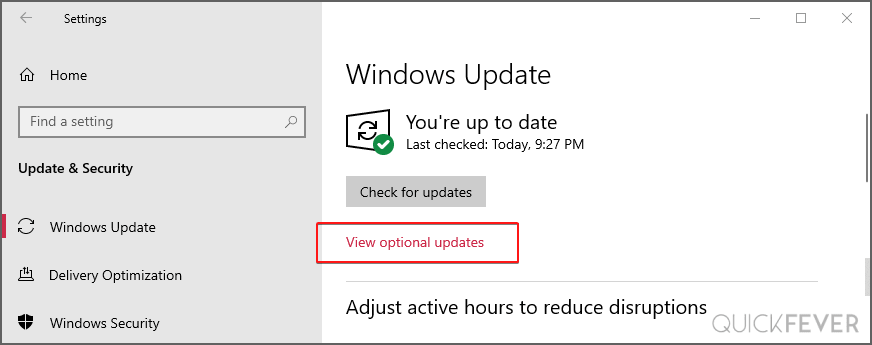
Now you have to click on the arrow icon. All optional updates will be shown here, select any update and download and install it. For this, you will need an internet connection. If you have a metered connection to your internet connection, then you can install such updates by coming here.
That’s it.
FAQs
1. What Is Universal ADB Driver?
UAD or Universal ADB Driver is a bridge between your device and the tools or commands you want your device to follow. It detects the mobile devices which sometimes, is not detected by the tool.
2. How To Disable ADB Driver?
Step 1. Goto Windows Device ManagerStep 2. Look for your installed ADB DriverStep 3. Right click on itStep 4. Select ‘Uninstall device’Step 5. From Uninstall device dialog box check ‘Delete the driver software for this device’Step 6. Click Uninstall.
3. How do I enable ADB debbuging on Android?
Step 1. You need to activate the developer options first for that, Goto Settings > About device > Tap the ‘Build Number’ 7 timesStep 2. Go back to Settings and select ‘Developer Options’Step 3. Look for ADB Debugging or USB debugging and enable it
4. How do I enable PTP mode on Android?
You can Drag down the notification panel and tap “Connected as ” and select Camera (PTP) or you can Goto Settings > Storage > Menu > USB computer connection and Select Camera (PTP)
5. What is Fastboot mode?
When your device is under a fastboot mode, it will accept system file changes. Other than fastboot mode, your device won’t allow any system changes.
6. How to open ADB command prompt?
Step 1. USB debbuging should be enabled on your device and connect your device to the PCStep 2. Open the platform tool folder on your PCStep 3. Shift+Right Click and select Open command promptStep 4. Type ‘adb devices’ and press EnterStep 5. list of all connected devices will appear on the screenStep 6. You can now enter your ADB commands
What is ADB?
Android Debug Bridge or ADB is a client-server program that lets you communicate with a device. ADB is a part of the Android Software Development Kit (SDK). Moreover, it includes three components viz. a client, a server, and a daemon.
Besides, a client is the one who runs on your development machine and sends a command. On the other hand, a daemon is the one that runs as a background process on your android device.
And lastly, the communication between the client and daemon is managed by a Server. This communication is most often done over a USB cable, but WiFi connections are also supported.
ADB can control your Android device over USB from a computer, transfer files, install apps, uninstall apps, run powerful shell commands, etc. As long as debugging mode is enabled on your Android device, you can send ADB commands from a computer.
Most important, the ADB commands can even work when your Android device is booted into recovery mode. Moreover, the best part is that your device doesn’t even need to be rooted in the ADB commands to work.
How to Install ADB Drivers of Android device:
Step 1. Make sure you have USB debugging enabled in your Android device. For this:
- Go to Settings > About phone, and then tap ‘Build number’ 7 times.
- Go back to Settings, then choose ‘Developer options’.
- Find the ‘USB debugging’ / ‘ADB Debugging’ option and use its toggle button to enable it. Accept warning by tapping on OK button.
Step 2. Connect your device to your PC/Laptop using a properly functional USB cable. Now launch the downloaded ADB file.
Step 3. Select your device from the list & click on Install. This process might take 2-3 mins to complete.
Step 4. Once the process is completed, you’ll see something similar to this:
ADB Drivers for all Android device
Step 5. Now you have completed the process. You can use ADB to modify/tweak system files.
Now you are all set to perform debugging operations. To learn how to modify Android files, you can refer Minimal ADB Tool. This drivers works with any Android device as its built for “Android OS” & it works with any device running on Android OS. Whether its Gingerbread or Android Marshmallow.
ADB Shell
Android полноценная система Unix со своим Shell, к которому можно подключаться по adb.
или
Команда подключит ваш терминал к shell устройства и вы сможете взаимодействовать с ним используя Unix команды, cat, ls, df и другие, а также запускать скрипты.
Чтобы выполнить одну команду, не переходя в shell используйте команду оболочки следующим образом.
Например,
Команда выше выдаст информацию о количестве свободной памяти на устройстве.
Следующая команда откроет на устройстве экран с настройками.
А две последующие через ADB включают и отключают соответственно прокси в настройках сети.
Данные команды могут быть полезными, когда к настройкам устройства нет явного доступа, например на устройствах с голосовыми интерфейсами. Я часто пользуюсь ими при отладке Яндекс.Станции.