Download android sdk platform tools(2020)
Содержание:
- Windows
- How to use Android SDK Platform Tools?
- Системные требования Android SDK
- Step 1 — Download the tools package
- Android 4.0
- «Уверен, если бы Смерть знала, что такое бюрократия, люди бы никогда не умирали, вечно стоя в очереди…» — Документация
- ADB LogCat
- Как включить отладку по USB на Android
- Configuring RAD Studio to Work with Your Installed SDK
- Features
- Install the Windows App SDK extension for Visual Studio
- Для чего нужен SDK Manager
- Why Use Platform Tools?
- Examples of ADB Commands
- How to setup ADB on macOS
- Android 3.1
- Команды ADB
- Функционал эмулятора
- How to Use Android SDK Platform tools (Installation)?
- How to install the Android SDK
- Как скачать и установить Xiaomi ADB Fastboot
- How to Download the SDK platform tools?
- Install ADB and Fastboot Platform Tools
- Особенности эмулятора
- Разбираемся
- Other tools and downloads
- Mac
Windows
- https://github.com/righ/android-platform-tools-zips/raw/master/windows/platform-tools_r03.zip
- https://github.com/righ/android-platform-tools-zips/raw/master/windows/platform-tools_r04.zip
- https://github.com/righ/android-platform-tools-zips/raw/master/windows/platform-tools_r05.zip
- https://github.com/righ/android-platform-tools-zips/raw/master/windows/platform-tools_r06.zip
- https://github.com/righ/android-platform-tools-zips/raw/master/windows/platform-tools_r07.zip
- https://github.com/righ/android-platform-tools-zips/raw/master/windows/platform-tools_r08.zip
- https://github.com/righ/android-platform-tools-zips/raw/master/windows/platform-tools_r09.zip
- https://github.com/righ/android-platform-tools-zips/raw/master/windows/platform-tools_r10.zip
- https://github.com/righ/android-platform-tools-zips/raw/master/windows/platform-tools_r11.zip
- https://github.com/righ/android-platform-tools-zips/raw/master/windows/platform-tools_r12.zip
- https://github.com/righ/android-platform-tools-zips/raw/master/windows/platform-tools_r13.zip
- https://github.com/righ/android-platform-tools-zips/raw/master/windows/platform-tools_r14.zip
- https://github.com/righ/android-platform-tools-zips/raw/master/windows/platform-tools_r15.zip
- https://github.com/righ/android-platform-tools-zips/raw/master/windows/platform-tools_r16.zip
- https://github.com/righ/android-platform-tools-zips/raw/master/windows/platform-tools_r17.zip
- https://github.com/righ/android-platform-tools-zips/raw/master/windows/platform-tools_r18.zip
- https://github.com/righ/android-platform-tools-zips/raw/master/windows/platform-tools_r19.zip
- https://github.com/righ/android-platform-tools-zips/raw/master/windows/platform-tools_r20.zip
- https://github.com/righ/android-platform-tools-zips/raw/master/windows/platform-tools_r21.zip
- https://github.com/righ/android-platform-tools-zips/raw/master/windows/platform-tools_r22.zip
- https://github.com/righ/android-platform-tools-zips/raw/master/windows/platform-tools_r23.zip
- https://github.com/righ/android-platform-tools-zips/raw/master/windows/platform-tools_r24.zip
- https://github.com/righ/android-platform-tools-zips/raw/master/windows/platform-tools_r25.zip
How to use Android SDK Platform Tools?
Navigate to the extracted folder using Command Prompt or Terminal. Use the following ADB and Fastboot commands as per your requirements.
Minimal ADB and Fastboot
If you are a regular user who uses adb and fastboot for simple usage like a flash, bootloader unlocks, you can use this software. It is a Windows version. All you have to do is download, extract, and install the executable file.
Download the ADB drivers.
Installation Steps
Download and extract the files. Select the adb setup file and run this as Administrator.
The installation window will open press “Y” twice to install adb system-wide.
Now you can find the adb files in your installed folder. You can access the command anywhere within your PC. But, it is better to copy the flash and boot files in this folder for the process.
How to use ADB
There are various things you can do with ADB; this tool supports a lot of commands to trigger most functions. Most of them deal with the recovery mode. I try to cover some essential commands.
Note: you must activate “Developer Options” on the device and turn on “USB Debugging” on the Android device before running ADB commands.
ADB commands
|
ADB Command |
Function |
|
adb reboot – bootloader |
Reboots Android device in bootloader mode |
|
adb reboot |
Reboots Android phone in normal mode |
|
adb push |
Move a file from local system to an Android phone’s location |
|
adb devices |
Displays all connected ADB compatible devices |
|
adb pull |
Moves a file from Android to your PC |
|
adb install |
Installs an app from your system’s .apk file location to your Android device |
|
adb connect |
Use ADB commands over Wi-Fi Network |
|
adb backup |
Backs up the Android device |
|
adb shell screencap |
Captures a screenshot of the device |
|
adb sideload file |
Push the file to your mobile device and Install it. |
Launching ADB requires you know about CMD – Command Prompt. This is because you need to start CMD and use commands to access the folder where you extracted the Platform Tools and launch adb.exe.
How to use Fastboot
Fastboot installs alongside ADB when you extract the ZIP file. Fastboot allows you to run commands on and Android device that is in bootloader mode. There are, however, other ways to use an Android device in bootloader mode, but using Fastboot is the best option. Also, it is possible to unlock an Android device bootloader using Fastboot to install a custom system file.
However, before Fastboot commands can work on an Android device, you must activate “Developer Options” on the device and turn on “USB Debugging.”
Fastboot commands
|
Fastboot Commands |
Functions |
|
re-locks the bootloader of an unlocked device |
|
|
fastboot devices |
Shows the serial number of a connected Android device |
|
fastboot flash recovery (filename) |
Flash the file from PC |
|
fastboot boot recovery (filename) |
Boot the data from PC |
|
fastboot oem unlock |
Unlock the bootloader of connected Android device |
Системные требования Android SDK
Для Windows официальные системные требования следующие:
- ОС Windows 7/8/10;
- Минимум 3 ГБ оперативной памяти для запуска, 8 ГБ рекомендовано;
- Дополнительно 1 ГБ свободной оперативной памяти для эмуляции и тестирования работы приложений;
- Минимум 2 ГБ свободного места на диске для установки, рекомендуется 4 ГБ для создания файла подкачки;
- Монитор с разрешением 1280 x 800 или выше.
Версии для Mac и Linux предъявляют почти аналогичные требования к аппаратной части компьютера, но имеют свои отличия в программной части. Mac:
- Mac OS X 10.10 (Yosemite) или новее, но не выше 10.13 (macOS High Sierra);
- 1.5 ГБ свободного места для установки эмулятора;
- 500 МБ на диске для интегрированной среды разработки (опционально).
Официально версия Linux тестировалась на Ubuntu 14.04. Имеет следующие требования:
- Графическая оболочка GNOME или KDE;
- Библиотека GNU C (glibc) 2.19 или новее.
Step 1 — Download the tools package
First, you need to download the tools package. And with this package you can download the others.
- First, go to the Android Studio download page: https://developer.android.com/studio;
- Then click in “Download Options”;
- There you will find a table named “Command line tools only”;
- This table contain some zip files. Download the appropriate file for your system (Windows, Mac or Linux);
- Extract this zip and you will get a folder called tools: This is the tools package i explained earlier;
Create a folder anywhere you prefer to place your SDK. I recommend you to stick with one of these commonly used places:
on Windows:
- Globally: C:\Android\sdk or C:\android-sdk (this is not default, but i usually set my SDK here on Windows)
- One user only: C:\Users\<username>\AppData\Local\Android\sdk
on Linux
- Globally: /opt/android/sdk or /opt/android-sdk
- One user only: /home/<username>/.android/sdk
on MacOS
- Globally: /Library/Android/sdk
- One user only: /Users/<username>/Library/Android/sdk
And move the tools folder to this new sdk folder. Make sure you have admin access to this folder and any sub-folders inside it, or the tools package will fail to download new packages.
Note: You can also download a pre-build package for your SO (like the one available on Ubuntu repository). But i do not recommend you do to so, because they probably will not be updated and will be harder to manage, since it was automatically installed.
Android 4.0
(December 2011)
Maintenance update. The system version is 4.0.2.
- Dependencies:
- SDK Tools r14 or higher is required.
(October 2011)
Initial release. The system version is 4.0.1.
- Dependencies:
- SDK Tools r14 or higher is required.
Emulator Skins
The downloadable platform includes the following emulator skins:
- QVGA (240×320, low density, small screen)
- WQVGA400 (240×400, low density, normal screen)
- WQVGA432 (240×432, low density, normal screen)
- HVGA (320×480, medium density, normal screen)
- WVGA800 (480×800, high density, normal screen)
- WVGA854 (480×854 high density, normal screen)
- WXGA720 (1280×720, extra-high density, normal screen) new
- WSVGA (1024×600, medium density, large screen) new
- WXGA (1280×800, medium density, xlarge screen)
To test your application on an emulator that represents the latest Android device, you can create
an AVD with the new WXGA720 skin (it’s an xhdpi, normal screen device). Note that the emulator
currently doesn’t support the new on-screen navigation bar for devices without hardware navigation
buttons, so when using this skin, you must use keyboard keys Home for the Home button,
ESC for the Back button, and F2 or Page-up for the Menu button.
However, due to performance issues in the emulator when running high-resolution screens such as
the one for the WXGA720 skin, we recommend that you primarily use the traditional WVGA800 skin
(hdpi, normal screen) to test your application.
«Уверен, если бы Смерть знала, что такое бюрократия, люди бы никогда не умирали, вечно стоя в очереди…» — Документация
Но даже если у вас очень красиво и актуально названы все модули, классы, методы и свойства, документацию все равно необходимо написать. Во-первых, это очень сильно сбережет вам нервы (количество вопросов клиентов уменьшается на порядок. Все есть в документации), а во-вторых, всегда понятно, почему вы сделали так, а не иначе.
Мы выбрали самый простой путь — summary + articles. Мы добавляем Xml атрибуты для методов и классов, которые светятся в intellisense как подсказки. Используя Docfx мы строим документацию по этим атрибутам и получаем подробную и удобную документацию, которую дополняет статьями, описывающими сценарии использования и примеры.
ADB LogCat
Logcat — инструмент для работы с логами Android.
В простейшем случае, чтобы вывести журнал системных сообщений устройства используйте следующую команду.
или через shell
Для остановки сбора логов нажмите Ctrl+C на клавиатуре (Command + C на Mac).
Чтобы вывести лог на экран и выйти из logcat используйте параметр -d.
В записях лога в Android указан приоритет:
- V — verbose (низший приоритет);
- D — debug;
- I — info;
- W — warning;
- E — error;
- F — fatal;
- S — silent (наивысший приоритет, ничего не выводится).
Фильтровать сообщения по приоритету можно следующим образом.
Кроме приоритета у записей указан тэг компонента системы, от которого принято сообщение.
В дополнение к тэгу и приоритету в логе так же содержатся поля с метаданными. Формат можно изменять с помощью параметра -v, за которым следует один из нижеперечисленных форматов вывода:
- brief — показывать приоритет, тэг и PID процесса (формат по умолчанию);
- process — показывать только PID;
- tag — показывать только приоритет, тэг;
- thread — показывать только процесс, поток и приоритет, тэг;
- raw — показать необработанное сообщение, без полей метаданных;
- time — показывать дату, время вызова, приоритет, тэг и PID процесса;
- long — показывать все поля метаданных и отдельно сообщения с пустыми строками.
Список параметров команды logcat:
-d вывести лог на экран и выйти;-b загрузить альтернативный буфер лога для просмотра, такой как event или radio;-c очистить лог и выйти;-f записать сообщения лога в файл. По умолчанию в stdout;-g вывести размер указанного буфера лога и выйти;-n установить максимальное количество ротаций лога;-s устанавливает silent фильтром по умолчанию;-v устанавливает формат вывода сообщений лога. По умолчанию brief.
С полным списком команд logcat можно ознакомиться на сайте .
Как включить отладку по USB на Android
Отладка по USB включается в настройках системы в разделе Параметры разработчика.
На Android 4.2 и выше раздел параметров разработчика по умолчанию скрыт. Чтобы сделать его видимым, перейдите в Настройки – О телефоне и нажмите Номер сборки (в редких случаях Номер модели) 7 раз (в редких случаях 10). На экране отобразится уведомление «Теперь вы разработчик!«
В настройках должен появиться пункт меню Параметры разработчика, найдите в нем пункт Отладка USB и активируйте его.
На некоторых устройствах раздел с параметрами разработчика может располагаться в других разделах настроек или иметь другое название.
Подробнее о параметрах разработчика на устройствах Android можно ознакомится на .
Configuring RAD Studio to Work with Your Installed SDK
You can use specific versions of the Android SDK simply by pointing the RAD Studio SDK Manager to your installed <SDK> location.
- Open the Create a New Android SDK wizard by using either Tools Options or Project Manager:
- Choose Tools > Options > Environment Options > SDK Manager | Add | Add new.
- In the Project Manager:
- Right-click the Android target platform and select Properties from the context menu.
- In the SDK field on the Platform Properties dialog box, click Add new in the dropdown list.
- On the Add a New SDK dialog, click Add new in the dropdown list.
- In the Android SDK Base Path and the Android NDK Base Path fields, browse to and select your installed <SDK> and <NDK> locations, respectively.
- The Create a new Android SDK wizard now populates the rest of the fields here and on the Android tools locations page. Allow a moment for this process to complete.
- For any fields that are not auto-populated or are marked with , click the entry field and browse to the installed location of that library on your system.
Features
New system image
There are endless possibilities for improvement and customization in system images once you download the Platform tool’s latest version and start installing TWRP files.
Custom features
There are several things to try out together; you will be confused about which custom option you can choose for the core interface since tons of features available online.
Flash custom-made recovery
You can say custom recovery advanced version of timid stock recovery since it allows you to flash and then install features to your device while providing stable security.
Automatic reboot
This tool allows you directly boot devices from fastboot to normal mode through the fastboot reboot command that you need to type; thus, it performs automated reboot.
Install the Windows App SDK extension for Visual Studio
The Windows App SDK provides a unified set of APIs, project templates, and other tools for building Windows apps. This SDK is available as a Visual Studio extension (VSIX). You can choose from two versions of the extension: stable and experimental.
Note
If you previously installed the WinUI 3 Preview extension for Visual Studio, uninstall the extension. For more information about how to uninstall an extension, see Manage extensions for Visual Studio.
Install the stable release
To develop desktop (C#/.NET 5 or C++/WinRT) apps that can be used in production environments, install the latest stable extension. Choose one of these options to install:
-
In Visual Studio, click Extensions > Manage Extensions, search for Project Reunion, and install the latest extension.
Note
In the latest available stable release (0.8.2), the Windows App SDK extension for Visual Studio is named Project Reunion. In later releases, it has been renamed to Windows App SDK.
-
Alternatively, you can download and install the extension directly from Visual Studio Marketplace.
Install the experimental release
To develop desktop (C#/.NET 5 or C++/WinRT) apps or UWP apps that use the latest experimental features, install the latest experimental extension. This version of the Windows App SDK cannot be used by apps in production environments. Choose one of these options to install:
-
In Visual Studio, click Extensions > Manage Extensions, search for Windows App SDK (Experimental), and install the latest extension.
-
Alternatively, you can download and install the extension directly from Visual Studio Marketplace.
Для чего нужен SDK Manager
SDK (англ. аббревиатура software development kit) – это по большому счёту комплект различных средств разработки, позволяющий специалистам, работающим с программным обеспечением создавать приложения для специальных пакетов программ, игровых консолей, ПО основных средств разработки, операционной и компьютерной систем, игровых консолей, и пр.
Этот инструмент используется для:
- Получения прав «суперпользователя».
- В целях обеспечить доступ к системной части прошивки и её изменения
А ADB позволит:
- Увидеть подключённые устройства, которые смогут работать с ADB
- Просмотреть лог системы Android
- Делать копии файлов как с аппарата Андроид, так и на него
- Удалить (или очистить), а также прошить (или перезаписать) раздел «data»
- Создавать разные скрипты управления Android-устройством
- Осуществлять управление некоторыми из сетевых параметров гаджета
- И многое другое.
Why Use Platform Tools?
SDK Platform tools are basic the ADB drivers that work as a bridge. In simple words, it will assist you in unveiling performance beast, rooting assets, battery-saving, etc.
Yet, the essential prerequisite for a platform-tools set is that it allows you to unleash the utmost potential of your Android or iPhone device in a pretty fast pace manner.
For better understanding, when you transport your media data to a PC, the PC needs USB drivers to read the data correctly; the same goes for this as it read ADB drivers.
Following that, the system will identify your device, and in the case can the drivers don’t recognize your device in fastboot, it would be great to reinstall them precisely.
Whether you want a minimal set of customization or looking for a way to create the overpowered ecosystem, you must first consider in the checklist is adding this tool.
Apart from this, what we have covered until now is just the tip of a vast iceberg; there are tons of significant usage you can swat for, so let’s have a look at those features.
Examples of ADB Commands
To check if you have successfully installed ADB, connect your device to your PC/Mac with your USB cable, and run the command as described above. It should display your device listed in the Command Prompt/PowerShell/Terminal window. If you get a different output, we recommend starting over with the steps.
As mentioned above, you can use ADB to do all sorts of things on an Android device. Some of these commands are built directly into the ADB binary and should work on all devices. You can also open up what is referred to as an ADB Shell and this will let you run commands directly on the device. The commands which are run directly on the device can vary from device to device (since OEMs can remove access to certain ones, and also modify adb behavior) and can vary from one version of Android to the next as well.
Below, you’ll find a list of example commands which you can do on your device:
- Print a list of connected devices:
- Kill the ADB server:
- Install an application:
- Set up port forwarding:
- Copy a file/directory from the device:
- Copy a file/directory to the device:
- Initiate an ADB shell:
Bonus
For those who want to take this a step further, you can follow this new tutorial we put together that will walk you through how to set up ADB so that you can use the command from any directory on a Windows or Linux desktop.
How to setup ADB on macOS
- Download the Android SDK Platform Tools ZIP file for macOS.
- Extract the ZIP to an easily-accessible location (like the Desktop for example).
- Open Terminal.
- To browse to the folder you extracted ADB into, enter the following command:
- For example, on my Mac it was this:
- Connect your device to your Mac with a compatible USB cable. Change the USB connection mode to “file transfer (MTP)” mode. This is not always required for every device, but it’s best to just leave it in this mode so you don’t run into any issues.
- Once the Terminal is in the same folder your ADB tools are in, you can execute the following command to launch the ADB daemon:
- On your device, you’ll see an “Allow USB debugging” prompt. Allow the connection.
- Finally, re-enter the command from step #7. If everything was successful, you should now see your device’s serial number in macOS’s Terminal window.
Congratulations! You can now run any ADB command on your device! Now go forth and start modding your phone by following our extensive list of tutorials!
While the guide above will certainly work, some seasoned macOS users should be aware that there can be an easier way to install ADB on their Macs using an unofficial package manager such as Homebrew or MacPorts.
Android 3.1
(July 2011)
- Dependencies:
-
Requires SDK Tools r12 or
higher. - Notes:
-
Improvements to the platform’s rendering library to support the visual layout editor in the ADT
Eclipse plugin. This revision allows for more drawing features in ADT and fixes several
bugs in the previous rendering library. It also unlocks several editor features that were added in
ADT 12.
(May 2011)
- Dependencies:
-
Requires SDK Tools r11 or
higher. - Notes:
-
Fixes an issue with the visual layout editor rendering library that prevented Android 3.1 from
running in ADT.
(May 2011)
- Dependencies:
-
Requires SDK Tools r11 or
higher.
Emulator Skins
The downloadable platform includes the following emulator skin:
WXGA (1280×800, medium density, xlarge screen)
For more information about how to develop an application that displays
and functions properly on all Android-powered devices, see Supporting Multiple
Screens.
Команды ADB
Перед выполнением команд adb полезно знать, какие экземпляры устройств подключены к серверу adb. Список подключенных устройств можно посмотреть следующей командой.
В ответ adb выведет серийный номер, состояние и описание (параметр -l) подключенных устройств.
В примере ниже показаны три устройства. Первые два — эмуляторы, третье — аппаратное устройство, подключенное к компьютеру.
Если запущен только один эмулятор или подключено только одно устройство, команда adb отправится на это устройство по умолчанию. Если же запущено несколько эмуляторов и / или устройств, необходимо использовать параметры -d, -e или -s, чтобы указать устройство, на которое должна быть направлена команда.
Нижеприведенная команда отправится на устройство с указанным серийным номером.
Команда отправится только на устройство подключенное через USB. Выдаст ошибку, если подключено больше одного устройства.
Команда отправится на устройство в эмуляторе. Выдаст ошибку, если подключено больше одного эмулятора.
Подсоединиться к андроид хосту по протоколу TCP/IP (по умолчанию порт 5555, если не указан другой).
Отсоединиться от андроид подключенного через TCP/IP (по умолчанию порт 5555). Если не задан ни один параметр, отключиться от всех активных соединений.
Перезапуск демона с правами root.
В некоторых случаях может потребоваться остановить сервер adb, и перезапустить его, чтобы решить проблему (например, если adb не отвечает на команды).
Остановить сервер.
Запустить сервер.
Копировать файл или папку на устройство.
Например,
Копировать файл или папку с устройства на компьютер.
Копировать с компьютера на устройство только новые файлы. С ключом -l не копировать, только создать список.
Установить приложение на устройство.
Например,
Ключи:-l блокировка приложения;-r переустановить приложение, с сохранением данных;-s установить приложение на карту памяти.
Чтобы удалить приложение с устройства используйте следующую команду.
Ключ -k означает, не удалять сохраненные данные приложения и пользователя.
Сделать скриншот экрана устройства.
Полученный скриншот можно сразу забрать на компьютер.
Для записи видео с экрана устройства используйте команду screenrecord.
или с параметрами
Чтобы остановить запись используйте комбинацию клавиш Control + C (Command + C на Mac). По умолчанию максимальный лимит для видео составляет 3 минуты.
С полным списком команд adb можно ознакомиться на сайте .
Функционал эмулятора
По сравнению с другими эмуляторами, Android SDK резко выделяется своим мощным функционалом. Этот функционал обеспечивает наиболее точную эмуляцию Андроида, в то время как другие эмуляторы жертвуют производительностью в угоду точности.Android SDK может эмулировать не только саму операционную систему, но и «железо». На выбор доступно множество виртуальных устройств с поддержкой Андроида:
- Смартфоны;
- Планшеты;
- Телевизоры;
- Умные часы;
- Очки, шлемы дополненной и виртуальной реальности;
- Бортовые компьютеры автомобилей;
- Терминалы.
Также присутствует эмуляция различных технологий, например, Bluetooth, WiFi, 2G, 3G, Edge.
Встроенная среда разработки поддерживает написание кода программы с подсветкой синтаксиса и авто дополнением. Среди поддерживаемых языков программирования есть C, C++, Kotlin и Java. Можно одновременно скомпилировать несколько apk одного проекта, каждый для разного устройства и версии ОС. С помощью встроенного диспетчера можно отслеживать нагрузку эмулятора на систему.
How to Use Android SDK Platform tools (Installation)?
Video Guide
After downloading the appropriate Platform-Tools, you have to extract the Zip file and then open the extracted folder. Then launch a command window from inside the Platform-Tools folder. To do so, press Shift + Right Click on the blank space and select the option Open Command Window/power shell window Here option.

Once the command window opens, you can execute any command you want.
Rootmygalaxy a.k.a RMG was started in 2015 with a solo goal of Helping users with easy How-to guides. Slowly the website started sharing exclusive Leaks and Tech News. In these 5 years, we have been credited by the likes of Forbes, CNBC, Gizmodo, TechCrunch, Engadget, Android Authority, GSM Arena and many others. Want to know more about us? Check out our About Us page or connect with us Via , , Youtube or Telegram.
How to install the Android SDK
To Install a new SDK click the checkbox, Similarly to update an SDK. Whenever an update is available a dash appears in the checkbox next to the package. The status field shows the current installation status of the SDK.
To remove or uninstall a package, unselect the checkbox
Click on the Apply or OK button to begin the installation.
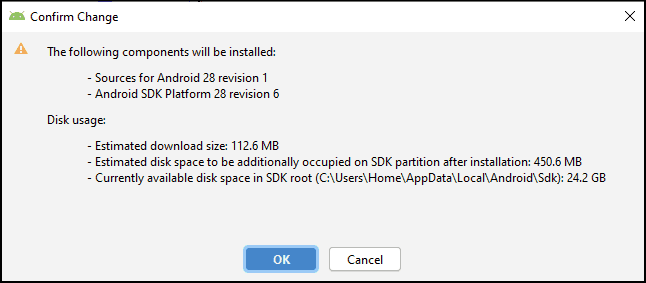 Installing the Android SDK. Confirm Change
Next, you may be asked to accept the License Terms and then the installation begins. Installation takes some time to complete depending on the no of packages you have selected.
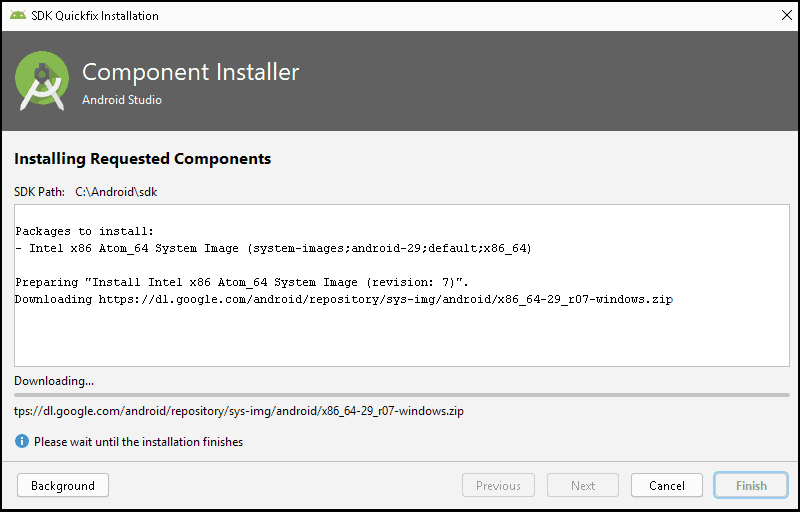 Downloading & Installing Android SDK
Once done, click on Finish. Now the Android SDK is successfully installed.
Как скачать и установить Xiaomi ADB Fastboot
Программу создал и поддерживает независимый разработчик, который выложил её на GitHub. В отличие от обычных утилит, здесь нет установочного файла (обычно .exe) — после загрузки вы увидите файл формата .jar.
XAFT создан для работы в среде виртуальной машины Oracle Java, поэтому для работы требуется установить Java Runtime Environment (JRE) версии 11 или более поздней. Если она у вас не установлена, то это можно сделать с помощью официального сайта Oracle:
- Windows — установите Oracle Java отсюда или OpenJDK отсюда.
- macOS — Установите Oracle Java отсюда.
- Linux — установите Oracle Java отсюда или OpenJDK из предпочитаемого диспетчера пакетов (openjdk-11-jre).
Утилиты Xiaomi ADB/Fastboot в формате JAR работают в среде Java и подходят для Windows, Linux или macOS. Чтобы скачать их, загрузите файл XiaomiADBFastbootTools.jar с последней версией программы со страницы разработчика в GitHub (по этой ссылке всегда открывается самая последняя версия XAFT).
ТОП-5 производительных смартфонов Xiaomi по рейтингу AnTuTu:
- 1 Black Shark 4 Pro 867578 баллов
- 2 POCO F3 Pro
821847 баллов
- 3 Mi 11 Ultra
817225 баллов
- 4 Mi Mix Fold
815000 баллов
- 5 Mi 11 Pro
804210 баллов

На момент написания этой статьи, последняя версия Xiaomi ADB/Fastboot Tools 7.0.3 датирована 31 августа 2021 года. В этой версии менеджер приложений App Manager научился удалять приложения YouTube Music и Google One, в загрузчике ROM исправлено самоочищающееся поле кодового имени, а сама программа получила несколько улучшений и исправлений пользовательского интерфейса.
После установки программы можно приступать к подключению устройства. Доступны два режима: ADB и Fastboot.
How to Download the SDK platform tools?
You will be able to download the ADB and Fastboot which are the Android SDK tools from Google officially, or you can check the direct download links below. Many of the users of Android have utilized ADB and fastboot and some other kits in their Android mobiles.
If you want to Flash or Unlock the bootloader of your Android device, these Android SDK tools come into the play. Usually to install the ADB or the fastboot you can download the Android SDK which can be found on the Android studio. This you can set up in your pc. For that, you have to download the whole tool kit which will in size 1GB.
At the moment there is a Minimal ADB and Fastboot tools made by the developers. However, It is for most of the time the best option to download them from a trustworthy source. The updated ADB and fastboot is downloadable in the windows, Mac and Linux. They can be found in the zip package which you can download and take it from the computer easily. The size is about 10MB. The smallest of the command lines can be measured as 200MB in size. You do not require all of it if you want to do the ADB and fastboot functions on your mobile.
You should not trust the third party ADB and fastboot files and toolkit because they may not be reliable. They can be malicious. When there are many new versions released, the old versions may become unsuitable for the phone you use. So always stick with the latest version of the Android SDK Platform toolkit.
Install ADB and Fastboot Platform Tools
- For these commands to run, you would either be required to download ADB and Fastboot Platform Tools (Windows | Linux | macOS). This is the official tool provided by Google and you should only use this one, not any other third-party ADB binaries.
- If you are using ADB and Platform Tools, then after installing them, you need to execute the codes using the PowerShell Window or the Command Prompt. Let’s say you installed the tools in C:\adb, then for using the Powershell or Command Prompt:
- Go inside that folder (i.e C:\adb\platform-tools),
- While pressing the Shift key right-click on an empty location.
- Select ‘Open PowerShell window here. Begin typing the codes.
- On the other hand, if you prefer to use Command Prompt, then head over to the platform-tools folder, type in CMD in the address bar, and hit Enter. This will launch the CMD window.
Особенности эмулятора
Эмулятор имеет много преимуществ перед аналогами:
- Стабильность;
- Высокая производительность;
- Официальная техническая поддержка;
- Подробная документация и множество обучающих материалов;
- Встроенный файловый менеджер;
- Открытый исходный код;
- Поддержка стандартов GSM-телефонии;
- Тестирование созданных программ для Андроид;
- Поддержка виртуальных машин, например, Dalvik;
- Настраиваемый интерфейс.
Благодаря этим особенностям, Android SDK можно назвать самым функциональным в своей области. Сочетание средств разработки и возможности быстрого тестирования в одной программе определенно порадует разработчиков мобильных приложений
Рядовым пользователям, возможно, стоит обратить внимание на более простые аналоги
Разбираемся
Windows SDK — пакет для создания приложений. В него входят новейшие заголовки, библиотеки, метаданные, и другие компоненты. Слово AddOn означает как дополнение, то есть дополнительный компонент.
Версия для Windows 10 позволяет создавать как классические, так и универсальные приложения.
Как пакет мог попасть на ПК:
- Был скачан с офф сайта Майкрософт и установлен.
- Был автоматически установлен как компонент Visual Studio (среда разработки для разработчиков).
- Третий вариант — мое мнение. Если он вдруг появился сам по себе, то мог установиться как обновление. Второй вариант — появился после установки некоторой крупной программы.
Что интересно — разработка приложений UWP для десятки версии LTSB не поддерживается:

Инфа с офф сайта)
Версия для десятки, а точнее для билда 1809, содержит новые API-интерфейсы и обновленные средства для разработки приложений.
Вот картинка, видим что прога установлена среди остальных, но что главное — размер ее небольшой, всего 152 КБ:

Размер просто крохотный — поэтому можно оставить ее и не думать об удалении))
Тоже самое, но здесь прогу видим в списке окна Программы и компоненты:

Для вызова такого окна есть трюк — зажимаете Win + R, пишите команду appwiz.cpl, нажимаете ОК. В итоге откроется окно со списком установленного софта.
Установочное окно, где видим, то данная прога существовала еще во времена Windows XP:

Software Development Kit — набор средств разработки для программистов.
А вот и студия Visual Studio, где видим, что она при установке также может поставить Windows SDK:

Вывод — если вы программист — данный компонент у вас спокойно может быть.
Other tools and downloads
- To enhance the developer experience for MSIX-packaged desktop applications, you can optionally install the single-project MSIX packaging tools extension for Visual Studio and combine the packaging project settings into your application project. This extension enables you to develop and build your MSIX-packaged desktop application without requiring a separate packaging project. For more information, see Package your app using single-project MSIX.
- If you want to customize your device and install other features or packages, check out the developer setup scripts.
- For more tools and downloads, see Downloads and tools for Windows development.
Mac
- https://github.com/righ/android-platform-tools-zips/raw/master/macosx/platform-tools_r03.zip
- https://github.com/righ/android-platform-tools-zips/raw/master/macosx/platform-tools_r04.zip
- https://github.com/righ/android-platform-tools-zips/raw/master/macosx/platform-tools_r05.zip
- https://github.com/righ/android-platform-tools-zips/raw/master/macosx/platform-tools_r06.zip
- https://github.com/righ/android-platform-tools-zips/raw/master/macosx/platform-tools_r07.zip
- https://github.com/righ/android-platform-tools-zips/raw/master/macosx/platform-tools_r08.zip
- https://github.com/righ/android-platform-tools-zips/raw/master/macosx/platform-tools_r09.zip
- https://github.com/righ/android-platform-tools-zips/raw/master/macosx/platform-tools_r10.zip
- https://github.com/righ/android-platform-tools-zips/raw/master/macosx/platform-tools_r11.zip
- https://github.com/righ/android-platform-tools-zips/raw/master/macosx/platform-tools_r12.zip
- https://github.com/righ/android-platform-tools-zips/raw/master/macosx/platform-tools_r13.zip
- https://github.com/righ/android-platform-tools-zips/raw/master/macosx/platform-tools_r14.zip
- https://github.com/righ/android-platform-tools-zips/raw/master/macosx/platform-tools_r15.zip
- https://github.com/righ/android-platform-tools-zips/raw/master/macosx/platform-tools_r16.zip
- https://github.com/righ/android-platform-tools-zips/raw/master/macosx/platform-tools_r17.zip
- https://github.com/righ/android-platform-tools-zips/raw/master/macosx/platform-tools_r18.zip
- https://github.com/righ/android-platform-tools-zips/raw/master/macosx/platform-tools_r19.zip
- https://github.com/righ/android-platform-tools-zips/raw/master/macosx/platform-tools_r20.zip
- https://github.com/righ/android-platform-tools-zips/raw/master/macosx/platform-tools_r21.zip
- https://github.com/righ/android-platform-tools-zips/raw/master/macosx/platform-tools_r22.zip
- https://github.com/righ/android-platform-tools-zips/raw/master/macosx/platform-tools_r23.zip
- https://github.com/righ/android-platform-tools-zips/raw/master/macosx/platform-tools_r24.zip
- https://github.com/righ/android-platform-tools-zips/raw/master/macosx/platform-tools_r25.zip