Solved: driver power state failure on windows 10 21h1 update
Содержание:
- Изменение настроек электропитания
- 6. Disable Antivirus and Windows Defender
- Причины возникновения ошибки с кодом 52
- What is Error Driver Power State Failure?
- Change Power Settings in Nvidia Control Board
- BSOD Case 698 0x0000009f 0x00000003
- Method #6: Adjust Power Settings
- Обновление операционной системы
- Ошибки VIDEO_DRIVER_INIT_FAILURE
- Проблема на стороне комплектующих
- Method #1: Safe Mode
- Сбойные драйвера
- Solution 1: Install the driver using Driver Easy
- Solution 4: Fix driver conflicts
- как исправить driver power state failure windows 8 / 10.
- Manually Fixing Error Code: 0x0000246
- Что это за ошибка и почему она появляется
- 5. Update the BIOS
- Ошибка DRIVER_IRQL_NOT_LESS_OR_EQUAL
- Неполадки с режимом энергосбережения
- Change your Power Settings
- Recognized for best-in-class capabilities as an ISV Independent Software Vendor
- #10 – Do A System Restore
- Ошибки реестра
- Enter Safe Mode and Remove Just Recently Installed Drivers
- Solution 1: Download the Latest version of GIGABYTE APP Center
Изменение настроек электропитания
Данный способ исправления DRIVER POWER STATE FAILURE скорее служит в роли хитрого хода, нежели в роли таблетки.
Все дело в режиме сна. При выходе из этого режима, все компоненты ПК проходят некоторую проверку, и при наличии каких-либо неисправностей на стороне устройства, выпадает BSOD. В качестве решения я предлагаю отключить данный режим.
Отключаем быстрый запуск и режим сна
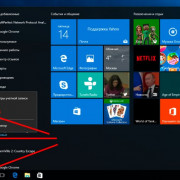
- Переходим в раздел «Электропитание». Сделать это можно через иконку батареи в трее или панель управления.
- В левом меню щелкаем по действию кнопок питания и попадаем в данный раздел.
- Далее нам нужно изменить параметры, которые сейчас недоступны, нажав по соответствующему пункту.
- Затем снимаем галочки с пунктов быстрого запуска и спящего режима.
- Перезагружаем компьютер.
Дополнительная настройка схемы питания
- Заходим в настройку текущей (активной) схемы.
- Жмем «Изменить дополнительные параметры».
- Для параметра «Отключать жесткий диск через» установите значение «0».
- Для раздела «PCI Express» значение «Откл».
- Если подключение к интернету осуществляется через Wi-Fi, то для «Параметры адаптера беспроводной сети» укажите «Максимальная производительность». То же самое сделайте для интегрированной графики (при наличии).
- Откройте «Диспетчер устройств«, в списке найдите Wi-Fi адаптер, войдите в «Свойства» и следом в «Управление электропитанием». Снимите галочки со всех пунктов.
- Перезагрузите ПК.
Способ помогает избавиться от DRIVER POWER STATE FAILURE во многих случаях, но далеко не во всех, особенно, когда проблема находится на стороне комплектующих. Это мы рассмотрим далее.
6. Disable Antivirus and Windows Defender
Antivirus software can sometimes remove or interfere with essential Windows files. This can also happen while updating drivers as sometimes the software falsely flags some files in the installation package.
It’s fairly easy to disable your antivirus software temporarily. Just right-click on your antivirus’ icon in the System Tray and click on disable protection. This is usually the way to go for most antivirus software, but it may differ across other antiviruses.
To disable Windows Defender, do the following:
- Search for Windows Security in the Start menu search bar and select the first result.
- In the dashboard, click on Virus & threat protection.
- Click on Manage Settings and disable Real-time protection.
Please note that you should only disable your antivirus temporarily. If disabling your antivirus stops the Driver Power State Failure error, you should consider changing your antivirus software for an alternative.
Причины возникновения ошибки с кодом 52
Ошибка «Не удается проверить цифровую подпись драйверов (код 52)» на каком-либо устройстве в Диспетчере устройств (или в «DxDiag») обычно сообщает пользователю, что Виндовс не смогла проверить цифровую подпись драйвера для данного компонента ПК. По этой причине Виндовс отказывается (или прекращает) работать с данным устройством, и даже может заблокировать возможность установки новых драйверов для проблемного девайса.
С данной ошибкой встречается множество пользователей, особенно часты случаи её появления на Виндовс 7. Указанная ошибка может быть вызвана множеством причин, начинает от инсталляции какого-либо специфического обновления, установки какого-либо некорректного или модифицированного драйвера и других релевантных факторов.

О наличии ошибки 52 обычно сигнализировать восклицательный знак на фоне жёлтого треугольника рядом с каким-либо устройством в «Диспетчере устройств». Переход же во вкладку «Общие» информации о данном устройстве информирует пользователя о наличии ошибки 52, связанной с отсутствием цифровой подписи у его драйвера.
What is Error Driver Power State Failure?
A BSOD appears with an error message or error code. As you are below, that means you have actually come across the error Driver Power State Failing or error code 0x0000009F. Both the mistakes are the same. Usually, when you put your computer on sleep mode, and then wake it back up out of sleep mode, some devices don’t get up in time or they don’t react in any way. When this occurs, the system crashes and shows the error Driver Power State Failing.
Yet, this error can take place because of several other factors too. Sometimes BSOD reveals this error together with the data name that is causing this error. In many cases, it is ntoskrnl.exe
Other factors that can create this error are:
- Faulty NVidia Graphics Card driver
- USB Device Failing
- Startup/booting error
- Error while making use of– Photoshop, Autocad, Kaspersky Anti-virus and McAfee Antivirus.
Driver Power State Failure is a Blue Display of Fatality error and also happens primarily as a result of an inappropriate driver mounted.
Generally Windows users start to panic when they see heaven display of death however in this case, I can inform you that there are some simple steps which you can take as well as fix the Driver Power State Failure in Windows 8.1.
So proceed and follow the tutorial below for a quick fix on this problem. On 99% of the instances, Driver Power State Failure is caused by placing your operating system to sleep mode state. To be more exact you will most likely encounter this mistake message when you attempt to log in to the device.
The mistake is brought on by the power settings or due to the fact that some drivers are having incompatibility issues in the system.
Change Power Settings in Nvidia Control Board
According to users, Driver Power State Failure mistake can show up as a result of your power settings. This problem shows up typically while making use of Nvidia graphics, yet you can fix it by following these steps:
- Open Nvidia Control Board.
- In the left pane, select Manage 3D settings.
- In the ideal pane, select your devoted graphics card as Preferred graphics processor. Situate Power administration mode in the listing of settings as well as select Prefer maximum performance.
- Save changes and also examine if that resolves your problem.
- According to users, switching to optimal efficiency repaired this issue for them, so make certain to try it out.
- This mode will certainly use more battery power, so maintain that in mind if you’re using a laptop computer. If you’re utilizing AMD graphics, you can find comparable settings in Driver Control Center.
BSOD Case 698 0x0000009f 0x00000003
Summary: Windows not starting, not a software fault. – bluescreen-of-death.comDetails: Bugcheck 0x0000009f (0x00000003, 0x847656b0, 0x85705380, 0x8512ddc0).
The most important being this… Bugcheck 0x0000009f …
http://www.geekstogo.com/forum/topic/301754-windows-not-starting-not-a-software-fault/ – 91k –
In cache – Gelijkwaardige pagina’sSuggestion: The more time you spend in front of your laptop the larger the probability that you may trip over an issue in future. hardware, as well as software might be the spawner of blue screens. Alas and alack, dumping the out of order memory bars, video card or harddisk frequently must be your sole way out….
More information…
There are the common error messages which may also ask for the user’s due circumspection:
Message: ERROR_IPSEC_IKE_FAILSSPINITNumeric code: 13853 (0x361D)Meaning: Failed to obtain security function table dispatch address from SSPI.
Message: ERROR_IPSEC_IKE_SHUTTING_DOWNNumeric code: 13891 (0x3643)Meaning: IKE service is shutting down.
They Solved “0x0000009f 0x00000003”:
Name: Nathaniel
Fixed on: 8.4.12
Error: Blue Screen caused by ntkrnlpa.exe – Microsoft Community
Details: Windows Vista Home Premium will start up on my computer and after about 5 minutes it freezes up. After about another 10 minutes it goes to a blue screen and shows …
Name: Emily
Fixed on: 4.9.9
Error: Stop 0x0000009f (0x00000003, 0x89168030… – Microsoft Community
Details: Feb 24, 2010 … 022110-36223-01.dmp 2/21/2010 8:31:14 PM DRIVER_POWER_STATE_FAILURE 0x0000009f 0x00000003 0x86036690 0x8078adb0 …
Name: Damien
Fixed on: 6.12.12
Error: Blue Screen caused by ntkrnlpa.exe – Microsoft Community
Details: 24 Feb 2010 … 022110-36223-01.dmp 2/21/2010 8:31:14 PM
DRIVER_POWER_STATE_FAILURE 0x0000009f 0x00000003 0x86036690
0x8078adb0 …
http://answers.microsoft.com/en-us/windows/forum/windows_7-system/blue-screen-caused-by-ntkrnlpaexe/e671b55e-8cfc-41cf-a686-67524c2fe485 – 70k –
In cache – Gelijkwaardige pagina’s
Started by: Roderick Date: 5.16.12
Time: 3:20
How to Fix 0x00000003, Follow These 3 Steps Right Now!
BSOD – 0x0000009F: DRIVER_POWER_STATE_FAILURE
Started by: Lola Date: 10.4.12
Time: 13:19
5 days ago … 032113-11544-01.dmp 21/03/2013 7:24:39 PM DRIVER_POWER_STATE_FAILURE 0x0000009f 0x00000003 0x87649030 0x82d2a9e0 …
ErrorHelp.com – Solution for [Stop 0x0000009F 0x00000003 …
Started by: Agatha Date: 11.2.11
Time: 16:2
0x0000009F : Type : Fatal : Windows : 2000, XP, Vista, 2008, 7: Vendor : Microsoft Corporation … 0x00000003: A device object has been blocking an IRP for too long a …
ErrorHelp.com – Solution for [Stop 0x0000009F 0x00000003 …
Started by: Clement Date: 5.19.9
Time: 15:5
Bugcheck 0x0000009f (0x00000003, 0x847656b0, 0x85705380, 0x8512ddc0). The most important being this… Bugcheck 0x0000009f …
Started by: Brian Date: 4.28.9
Time: 7:43
Solution for Stop 0x0000009F 0x00000003 DRIVER_POWER_STATE_FAILURE
A few simple tips for the BSOD
System installation CD might be a good remedy for complicated 0x0000009f 0x00000003 manifestations when incorrect programs cannot be caught in an alternative manner
Method #6: Adjust Power Settings
As mentioned previously, power settings issues can cause driver power state failure error. According to Windows 10 users, you can fix this error by disabling a few power settings. To change power settings:
Go to the taskbar, click the search icon or search bar then type control panel. Enter the first match.

In the Control Panel, select Hardware and Sound.
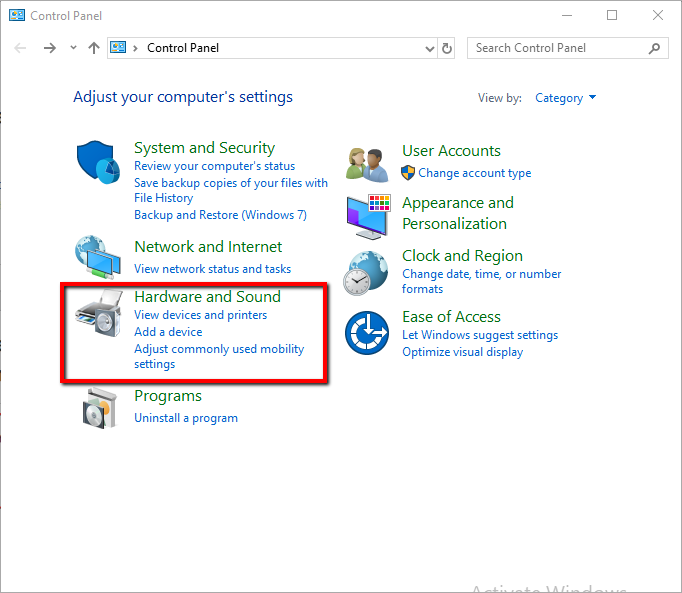
In the Hardware and Sound window, choose Power Options from the right pane.
From the left pane, select Choose what the power buttons do.
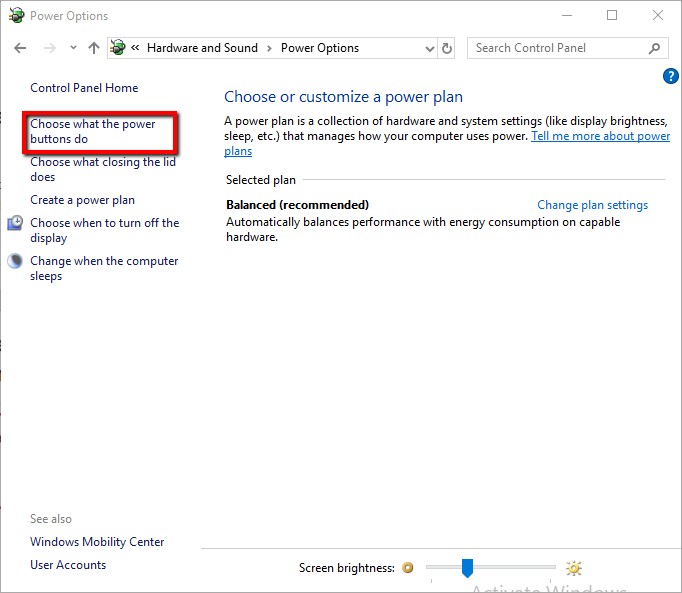
A pop-up window appears, click Change settings that are currently unavailable.

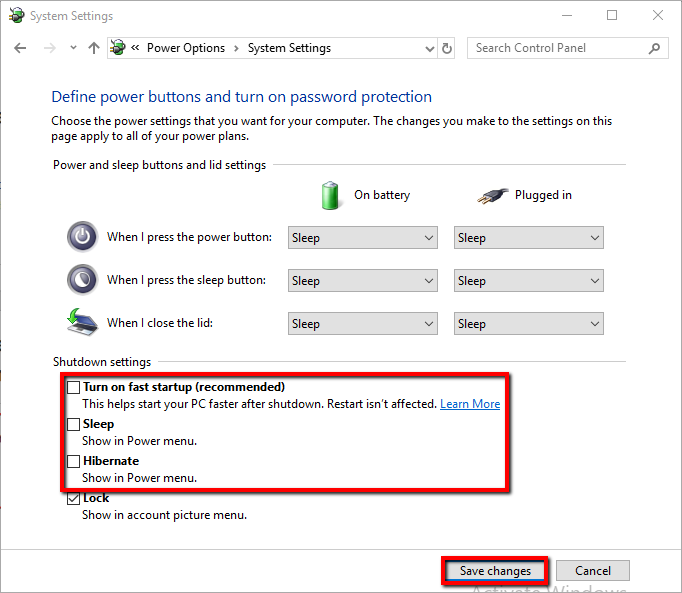
Step 6
Under Shutdown settings, unmark the checkboxes next to Turn on fast startup (recommended), Sleep and Hibernate. Then click Save changes.
Обновление операционной системы
Для обладателей бета-версии Windows 10 ошибка появлялась несколько раз до релиза операционной системы, особенно отметилось крупное обновление 1709. На ноябрь 2018 ОС не является причиной ошибки сама по себе, поэтому одним из вариантов устранения Driver Power State Failure может стать обновление Windows 10 до последней версии.
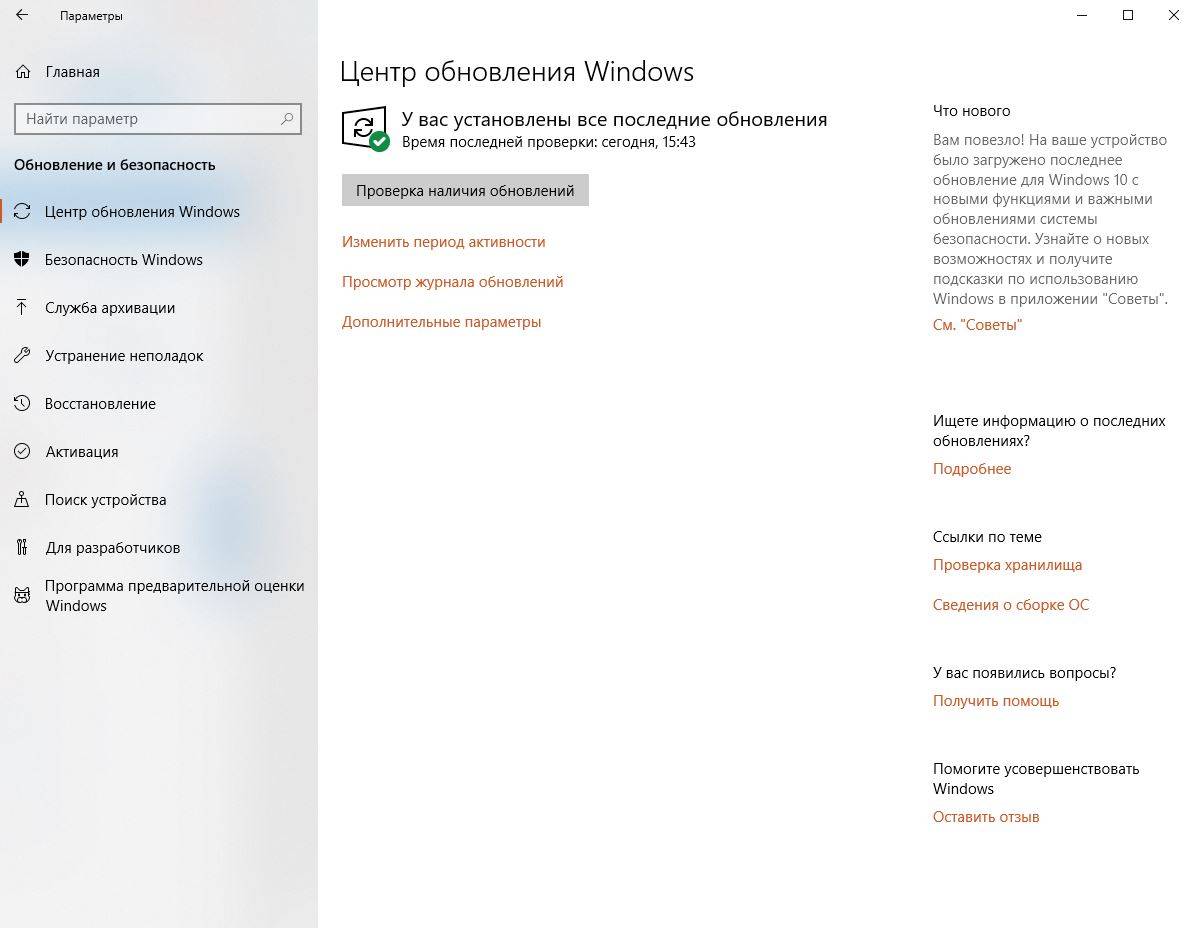
Проверить наличие последних обновлений вручную можно через меню «Пуск».
- Нажмите на кнопку «Пуск». Выберите шестеренку в левой части меню. Нажимаем на «Параметры»
- Перейдите в раздел «Обновления и безопасность». Переходим в раздел «Обновления и безопасность»
- В «Центре обновления» нажмите «Проверку наличия обновлений» и перезагружаем ПК. В «Центре обновления» нажимаем «Проверку наличия обновлений»
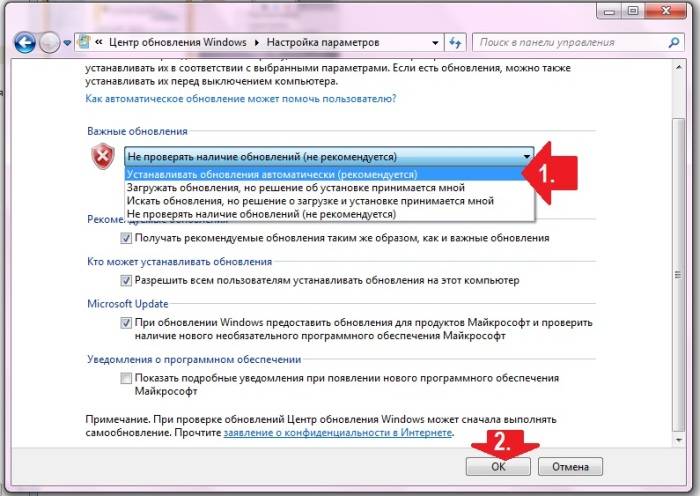
Для Windows 7 и 8 проблема иногда решается наоборот: полным отключением системы обновлений. Сделать это можно следующим способом.
Ошибки VIDEO_DRIVER_INIT_FAILURE
Проблемы VIDEO_DRIVER_INIT_FAILURE обычно связаны с ошибкой синего экрана смерти, также известной как ошибка «BSOD» или «Stop»:
- «Windows неожиданно завершает работу из-за проблемы с VIDEO_DRIVER_INIT_FAILURE. «
- «: (Извините, ваш компьютер столкнулся с проблемой с VIDEO_DRIVER_INIT_FAILURE и нуждается в перезагрузке сейчас. «
- «0x0A: IRQL_NOT_LESS_EQUAL — VIDEO_DRIVER_INIT_FAILURE»
- «STOP 0x0000001E: KMODE_EXCEPTION_NOT_HANDLED – VIDEO_DRIVER_INIT_FAILURE»
- «STOP 0×00000050: PAGE_FAULT_IN_NONPAGED_AREA – VIDEO_DRIVER_INIT_FAILURE»
Большинство ошибок BSOD возникают после установки аппаратного или программного обеспечения, связанного с Windowss. В основном ошибки, связанные с VIDEO_DRIVER_INIT_FAILURE, возникают в процессе установки Windows, во время загрузки программного или аппаратного обеспечения, связанного с Microsoft Corporation, во время последовательности загрузки драйвера устройства, связанного с Windows, или завершения/запуска Windows
Важно отметить, когда происходят ошибки синего экрана с VIDEO_DRIVER_INIT_FAILURE, так как это помогает устранять проблемы, связанные с Windowss, и сообщать о них в Microsoft Corporation
Проблема на стороне комплектующих
Сюда можно отнести: материнскую плату, ОЗУ, видеокарту, винчестер, сетевую карту и все остальное, что у вас присутствует в системе. Неисправность любого из комплектующих способно вызывать данную ошибку. Поэтому, если ни один из способов не помог, проверьте каждое из них.
ОЗУ
Оперативная память проверяется встроенной в Windows 10 и 8 утилитой:
- Найти ее можно через поиск. Для этого введите слово «оперативной» и войдите в требуемый раздел.
- Выберите первый пункт с пометкой «рекомендуется». Ваш ноутбук будет перезагружен с последующим автоматическим запуском проверки.
- Дождитесь окончания и посмотрите на строку «Состояние». Здесь будут находиться дефекты. После замены поврежденных планок ОЗУ, синий экран с кодом DRIVER POWER STATE FAILURE исчезает.
Есть еще один тест, который можно провести: выньте одну планку памяти и одну оставьте (конечно, если у вас их две), если одна, то переставьте ее в другой слот. Таким образом вы проверите, дело в слоте или в памяти. Действия проводятся при выключенном ПК.
Жесткий диск
Не менее важное устройство с более ограниченным сроком службы. Очень часто в результате износа или после различных повреждений (перегрев, падение, тряска, удары), нарушается его работоспособность, появляются BAD блоки и прочие ошибки, способствующие появлению неисправности

Первое, с чего следует начать – это проведение диагностики HDD, не забывая про такую замечательную программу, как Victoria и MHDD.
Если окажется, что его срок постепенно подходит к концу, следует заменить.
Остальные комплектующие
Сообщение DRIVER POWER STATE FAILURE могут вызывать и остальные компоненты, которые рассматривать более подробно я не вижу большого смысла, поскольку чаще всего их неисправность выявляет только специалист.
Скажу только, что:
- На материнской плате может перегреваться один из мостов, находиться вздувшиеся конденсаторы, а то и вовсе перестает работать один из слотов или ее компонентов.
- На стороне видеокарты возможен перегрев чипа, есть вздутые конденсаторы (больше относится к старым картам) и прочее.
- Помимо этого, нельзя исключать неисправность WiFi, Bluetooth модулей, сетевой или звуковой карты и всего остального, что у вас подключено дополнительно.
Если вы заметили неисправность в конкретном оборудовании, попробуйте его отключить.
Method #1: Safe Mode
We will explain 2 ways to access Safe Mode in Windows 10. They are:
- Get in Safe Mode when Windows cannot boot normally.
- Get in Safe Mode from Normal Mode.
Safe Mode is beneficial for you to troubleshoot the issue there.
- Get in Safe Mode when Windows cannot boot normally.
If Windows 10 does not boot normally 3 times over, the fourth time it gets in Automatic Repair. If you have launched Windows normally, skip this method.
Note: use this procedure if you cannot get in Safe Mode any other way.
Ensure your machine is shut down. Hold down the power button to turn on your machine, then press the power button until your computer shut down automatically.
Repeat step 1 two times or more until you see a screen indicating that the operating system is preparing for Automatic Repair.

The operating system will try to perform an automatic diagnosis for your computer.

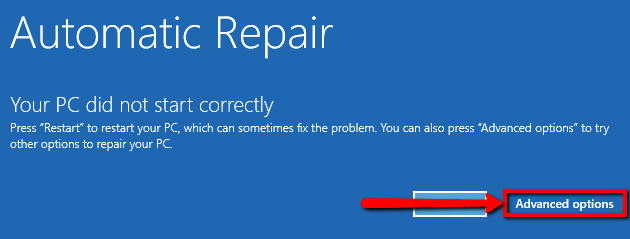
Automatic Repair window appears, click Advanced options.
Choose Troubleshoot option.
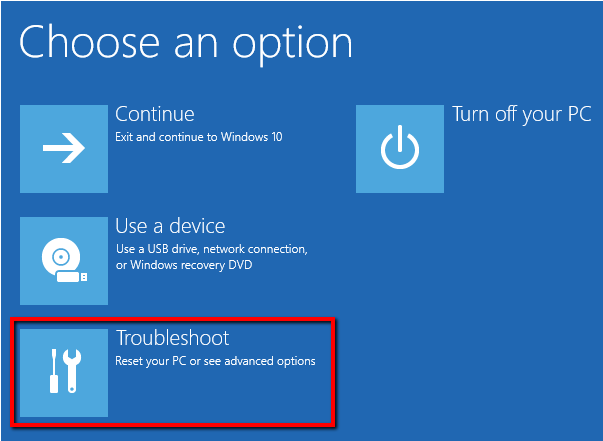
Troubleshoot screen appears, click Advanced options.

On the Advanced options screen, choose Startup Settings.

On the Startup Settings screen, click Restart.
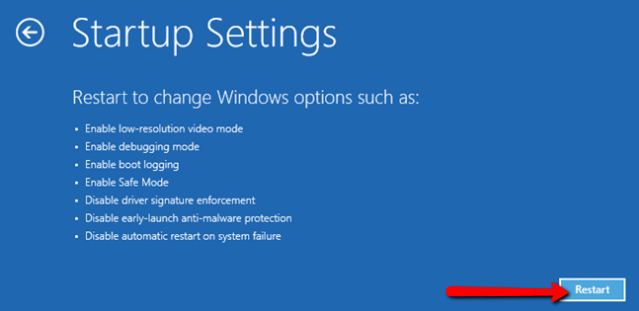
Step 9
The PC restarts and another screen appears you will see a list of different startup options. You will be given 3 different options for entering Safe Mode:
1. Enable Safe Mode – press either 4 or F4 key.
2. Enable Safe Mode with Networking – press either 5 or F5 key.
3. Enable Safe Mode with Command Prompt – press either 6 or F6 key.

1. Get in Safe Mode from Normal Mode.
If you have started your operating system normally, you can use this method. You will enter Safe Mode using the System Configuration tool. This tool is useful since it allows you to configure how your computer starts.
Press Windows key + R on your keyboard to open Run.
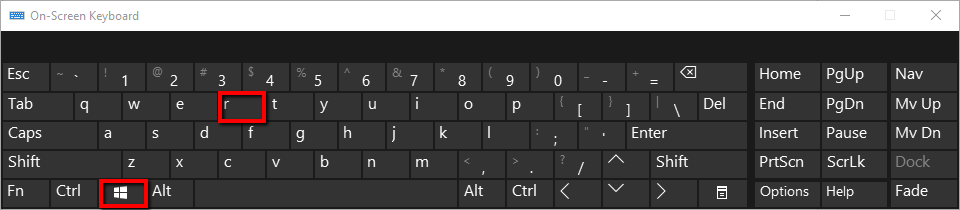
Type msconfig then hit Enter or click OK.
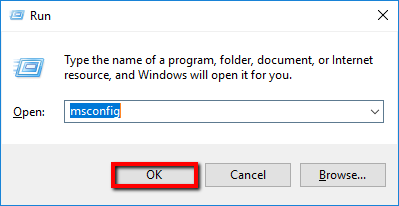
System Configuration opens, select the Boot tab.
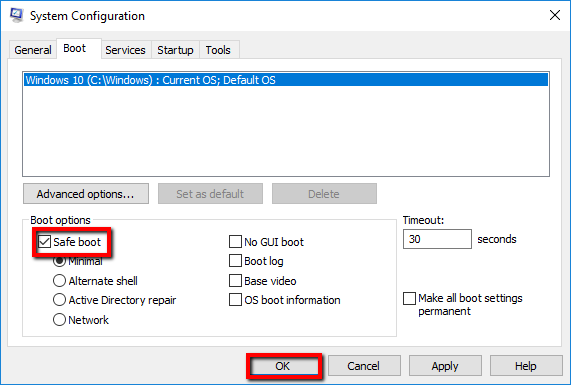
When prompted to restart your PC to apply these changes, click Restart.

Сбойные драйвера
Второе, что следует проверить – это драйвера. Они могут быть некорректно установлены или несовместимы с текущей версией Windows. Определить такие драйвера достаточно просто, обычно они помечаются красным или желтым знаком рядом с названием компонента в диспетчере устройств.
Для начала можно попробовать выполнить откат:
- Запустите диспетчер устройств, щелкните по сбойному компоненту и перейдите в его свойства.
- В открывшемся окне переместитесь в раздел «Драйвер» и щелкните «Откатить». Подтвердите действие.
- Перезагрузите ноутбук или компьютер.
Бывает такое, что кнопка «Откатить» не активна, тогда выполните обновление.
Альтернативным вариантом является использование сборников программ «SamDrivers», «Driver Booster» для автоматического обновления.
Solution 1: Install the driver using Driver Easy
Installing drivers manually is not easy. It sometimes causes errors you won’t expect like the error “Install Realtek HD Audio Driver Failure”.
If you have the problem installing the Realtek driver manually, you can update the driver automatically with .
Driver Easy will automatically recognize your system and find the correct drivers for it. You don’t need to know exactly what system your computer is running, you don’t need to risk downloading and installing the wrong driver, and you don’t need to worry about making a mistake when installing.
You can update your drivers automatically with either the FREE or the Pro version of Driver Easy. But with the Pro version it takes just 2 clicks:
- and install Driver Easy.
- Run Driver Easy and click Scan Now. Driver Easy will then scan your computer and detect any problem drivers.
- Click the Update button next to the Realtek audio driver to automatically download the correct version of this driver, then you can manually install it (you can do this with the FREE version).Or click Update All to automatically download and install the correct version of all the drivers that are missing or out of date on your system (this requires the Pro version – you’ll be prompted to upgrade when you click Update All).Realtek Audio Driver
Solution 4: Fix driver conflicts
Realtek has a known conflict with the Microsoft UAA Bus Driver for High Definition Audio. Follow steps below to fix the conflict.
- Go to Device Manager. Expand the System Devices branch and find Microsoft UAA Bus Driver for High Definition Audio.
- Right click on the device and click Disable.
- Go to Programs and Features and locate the Realtek High Definition Audio Driver entry. Uninstall the driver. (Do not reboot the system.)
- Go back to Device Manager and uninstall the disabled Microsoft UAA Bus Driver for High Definition Audio. (Do not reboot the system.)
- Reinstall the Realtek HD Audio Driver (If “Found New Hardware Wizard” pops up, ignore it.).
- After installation is complete, reboot the system.
как исправить driver power state failure windows 8 / 10.
Очень часто, эта ошибка делает Ваш компьютер или ноутбук полностью неприменимыми к работе. Поэтому вам нужно запустить компьютер в специфическом режиме.
Если Ваш компьютер нормально запускается, и Вы получаете эту ошибку во время работы системы, Вы можете пропустить этот шаг и переместиться ниже.
Есть две вещи, которые могут помочь Вам запустить виндовс:
- Safe Mode
- Startup Repair
Во-первых, Вы должны будете попытаться запустить компьютер в безопасном режиме, потому что это — самый быстрый способ открыть Windows, не получая ошибку посреди запуска.
Если открыть Safe Mode не удалось, придется использовать специальный инструмент восстановления Windows Sturtup Repair:
Восстановление при загрузке или startup repair (Windows 7) Восстановление при загрузке или startup repair win8/10
Manually Fixing Error Code: 0x0000246
If you are still experiencing issues with updating the driver or installing the Realtek software, you’ll need to fix your Registry.
Although there are third-party Registry scanning tools, these usually come with adware or only fix a limited amount of issues unless you activate the software.
To fix the issue manually, you’ll need to edit the Registry values.
Note: Before making manual updates, you should create a backup of the current Registry by exporting it to a location on your PC.
If anything goes wrong, you can simply import the old Registry to restore it to its previous state.
Manually Fixing the Device Install Settings in the Registry
- Hit the Windows Key + R and type “regedit” in the run box. Click Okay to start the Registry Editor.
Start Registry Editor
- In the Registry Editor, navigate and find Device Install Policy Key:
Device Install Registry Key
- If the Key does not exist, you’ll have to create it by navigating to the Windows folder, right-clicking on the folder and select New > Key.
Add New Registry Key
- Name the new Key “DeviceInstall”.
Create DeviceInstall Policy Key
- Add another Key below the DeviceInstall Key and name it “Settings”.
Add Settings Key
- In the Settings Key, create a new DWORD(32-Bit) entry and name it “InstallTimeout”.
Add InstallTimeout Entry
- Use the Right Hand Mouse Button to modify the value.
Modify InstallTimeout Value
- Set the value to 708 and click OK.
Update InstallTimeout Value to 708
- Restart your PC for the changes to take effect.
Note: If none of the above solves your issue, you may need to go back to a previous restore point in order to fix the problem.
As the Realtek HD audio driver failure with error code 0x0000246 relates specifically to an environment variable blocking installation privileges for the application, you should also check that your system didn’t disable the Device Install and Device Setup Manager services.
Что это за ошибка и почему она появляется
BSOD «DRIVER POWER STATE FAILURE» сообщает о проблеме на стороне драйвера устройства и возникает при изменении состояния питания устройства. Вот список причин, которые способны влиять на работу драйвера:
- Системные ошибки и сбои компонентов.
- Недавние обновления.
- Неправильно выставленные настройки Windows 10.
- Неисправность материнской платы, HDD диска, ОЗУ и других компонентов.
- Повреждение реестра.
- Наличие компьютерных вирусов.
Теперь, после того как мы выявили проблемные зоны, способствующие появлению ошибки «DRIVER POWER STATE FAILURE» (STOP: 0x0000009F), я расскажу, как это все дело исправить.
5. Update the BIOS
In the continuous onslaught of software, driver, and Windows updates, the BIOS is usually left out. It can mostly be attributed to the fact that it has to be done manually.
When dealing with the Driver Power State Failure, users should make sure that their BIOS is updated to the latest version. As explained here, the BIOS is an important part of your computer, so be sure to exercise the utmost caution while making any changes to it.
How to Check and Update the BIOS
- Type in System Configuration in the Start menu search bar.
- In the window, look for BIOS Version/Date and note down the version.
- Following this, visit your motherboard manufacturer’s website and look for the latest version of the BIOS in the downloads section.
- Download and run the installation file.
Before installation, you will get an option to backup the current version of your BIOS. Make sure to select the option in case things go south.
Ошибка DRIVER_IRQL_NOT_LESS_OR_EQUAL
Когда ошибка IRQL_NOT_LESS_OR_EQUAL вызвана DRIVER и указан какой-либо неисправный файл драйвера для irql в Windows 10 как iaStorA.sys, iaisp64 sys, Netwtw04.sys, nvlddmkm.sys, ndis.sys, wrUrlFlt.sys, то нужно удалить драйверы от видеокарты и обновить их заново. Ошибка будет выглядеть с приставкой DRIVER и звучать следующим образом driver_irql_not_less_or_equal и в конце будет ошибка драйвера видеокарты от различных производителей.
1. Обновите свой ПК с Windows 10
Перейдите в Параметры > Обновление и безопасность и нажмите «Проверить наличие обновлений», чтобы получить последнее обновление. Подождите пока обновление будет загружено, а затем перезагрузите компьютер. Надеюсь, ваш компьютер начнет работать нормально.
2. Обновить драйвер
- Щелкните правой кнопкой мыши значок Пуск и выберите Диспетчер устройств в списке.
- В диспетчере устройств, нажмите на вкладку Вид, после в раскрывающемся списке Показать скрытые устройства. Это покажет длинный список устройств в диспетчере устройств.
- Найдите устройство, приложение которое вызвало проблему и дважды щелкните по нему. Теперь вы можете просмотреть неисправный драйвер устройства. Далее щелкните по нему правой кнопкой мыши и выберите «Обновить драйвер».
- В следующем диалоговом окне выберите «Автоматический поиск обновленных драйверов» и подождите некоторое время для успешного обновления.
3. Альтернативный способ получить обновленный драйвер
В противном случае вы можете перейти на сайт производителя и получить обновленную версию драйвера. После завершения загрузки установите его на свой компьютер. Перезагрузите компьютер и убедитесь, что ошибка DRIVER_IRQL_NOT_LESS_OR_EQUAL на вашем ПК с Windows 10 не появляется.
4. Проверьте, отключен ли драйвер
Отключенный драйвер также вызывает ошибку DRIVER_IRQL_NOT_LESS_OR_EQUAL на синем экране Windows 10. Поэтому проверьте драйверы и включите их в диспетчере устройств, если они выключены.
5. Откат при возникновении проблемы после обновления драйвера
Во многих случаях получение обновления драйвера устройства становится главным фактором для этой проблемы с синим экраном. Если вы обновили windows с драйверами устройств и у вас стала появляться эта ошибка, то откат драйвера поможет вам вернутся к предыдущей версии. В обоих упомянутых решениях вы можете изучить подробности здесь, как удалить, отключить, откатить и обновить драйверы устройств.
Смотрите еще:
- Способы устранение ошибки IRQL_GT_ZERO в Windows
- Как исправить ошибку ACPI_BIOS_ERROR в Windows 10
- Исправить ошибку KMODE_EXCEPTION_NOT_HANDLED в Windows 10
- Ошибка STATUS_DEVICE_POWER_FAILURE или btmshellex.dll в Windows 10
- Ошибка CRITICAL_STRUCTURE_CORRUPTION в Windows 10/8.1/7
Загрузка комментариев
Неполадки с режимом энергосбережения
Если замена драйвера не помогла, отключите энергосбережение.
- Перейдите в «Панель управления» — «Оборудование и звук» — «Электропитание». Перехода в меню напрямую не существует, быстро попасть в панель можно через Win+R и команду «control».
Переходим в «Электропитание»
- Выберите «Настройка схемы электропитания» рядом с активной строкой. Внутри — нажмите «Изменить дополнительные параметры».
Нажимаем «Изменить дополнительные параметры»
- Найдите строку «PCI Express» и «Параметры адаптера беспроводной сети». Отключите для первого режим энергосбережения, для второго выставьте «Максимальная производительность».
Настраиваем производительность
- Перезагрузите ПК и снова протестируйте его на наличие проблемы.
Change your Power Settings
Occasionally Driver Power State Failure error can show up due to your power settings. According to users, you could be able to repair this trouble just by disabling particular power settings. To do that, adhere to these actions:
- Press Windows Key + S as well as get in control panel. Select Control panel from the checklist
- When Control Panel opens, locate as well as click Power Options
- Click on Choose what the power button does
- Now click Change settings that are currently unavailable
- Disable Switch off fast startup (recommended), Sleep as well as Hibernate options. Click on Save changes button.
Recognized for best-in-class capabilities as an ISV Independent Software Vendor
Solvusoft is recognized by Microsoft as a leading Independent Software Vendor, achieving the highest level of completence and excellence in software development. Solvusoft’s close relationship with Microsoft as a Gold Certified Partner enables us to provide best-in-class software solutions that are optimized for performance on Windows operating systems.
How is the Gold Competency Level Attained?
To achieve a Gold competency level, Solvusoft goes through extensive independent analysis that looks for, amongst other qualities, a high level of software expertise, a successful customer service track record, and top-tier customer value. As a Gold Certified Independent Software Vendor (ISV), Solvusoft is able to provide the highest level of customer satisfaction through delivering top-level software and service solutions, which have been subject to a rigourous and continually-audited approval process by Microsoft.
CLICK HERE to verify Solvusoft’s Microsoft Gold Certified Status with Microsoft >>
#10 – Do A System Restore
Doing a System Restore means returning your system back to a state it was in past. And for this, you will need to have a System Restore Point created on your PC when it was not affected by Driver Power State Failure error. If you do not have one, then you just have to skip this step altogether. And, if you do, then here are the steps for you to follow:
Step 1: On your Desktop, right click on the This PC icon, and click on Properties from the right-click menu.
Step 2: In the window that will open, click on the System Protection option on the left panel.
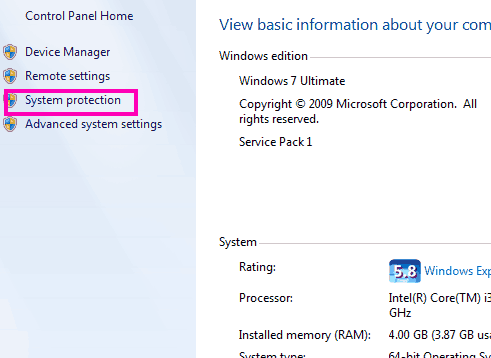
Step 3: Another new window will open. There, click on the System Restore button and select the restore point to which you want to roll back your computer to. Make sure that it’s a date before you started getting the Driver Power State Failure error in Windows 10. Run the restore and wait for System Restore to happen.
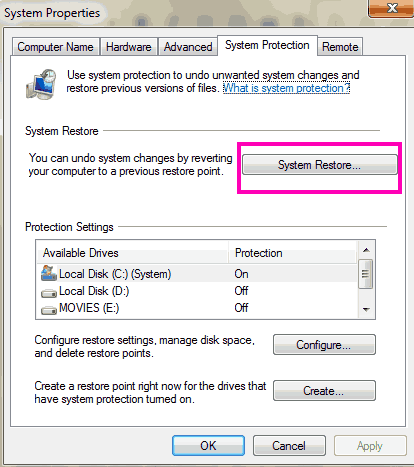
Note: Doing a System Restore will wipe out all the data that you have saved on your PC after the restore point date. So, make sure that you take a backup of important files on an external drive before restoring PC.
Closing Words
The first few steps will most probably fix Driver Power State Failure error for you. But if your PC isn’t fixed by them and you have to try the last few, make sure you know what you are doing. Especially in the case of Method 8 and 9. If need be, take help of a friend who is good with computers. You can also contact your PC manufacturer’s customer care if you are unable to fix the issue.
Ошибки реестра
Иногда ошибка возникает из-за некорректных записей в реестре — например, оставшихся от установки предыдущих устройств. Попасть во встроенный редактор реестра можно через Win+R и команду «regedit», но без знания источника проблемы меню будет бесполезным.

Окно «Редактор реестра»
Очистить реестр от записей, ведущих в никуда, могут специализированные программы. Самая популярная в 2021 году — чистильщик Ccleaner, удаляющий неактивные и неверные записи в автоматическом режиме.
- Для использования программы скачайте и установите ее с официального сайта.
- После запуска выберите раздел «Registry», проведите сканирование.
Выбираем раздел «Registry» и нажимаем «Поиск проблем»
- По завершению нажмите Fix selected errors.
Нажимаем «Исправить»
- После использования перезагрузите и протестируйте ПК на ошибку еще раз.
Версии программы или ОС значения не имеют, Ccleaner работает на всех современных Windows, начиная с XP.
Enter Safe Mode and Remove Just Recently Installed Drivers
To start with, we will need to become part of the Advanced startup of Windows 8.1 by following these steps:
- Go into the BIOS and make certain that the initial boot device is readied to your CD/DVD drive.
- Area the Microsoft Windows 8.1 boot DVD right into the CD/DVD drive.
- Reboot your Windows 8, Windows 10 and Windows 11 operating system.
- When prompt by the message Press any key to boot from CD or DVD please boot from the Windows 8 setup media CD by pushing any type of key on your keyboard.
- In the very first home window that shows up after you booted from the Windows 8.1 DVD you will need to left click or touch on the Next button.
- Left click or touch on the Repair your computer system option existing in the next display.
- From the Pick an option home window that shows up left click or tap on the Troubleshoot option.
- In the next window left-click or tap on the Advanced options.
- In the Advanced Options home window left-click or tap on the Command Prompt option.
- Write in the black home window (command prompt) the following: C: without the quotes. Press Enter to run the command.
- Following you will require to compose the complying with in the Command Prompt: BCDEDIT/ COLLECTION DEFAULT BOOTMENUPOLICY LEGACY. Press the Enter button on the keyboard.
- Write in the command prompt home window the following: EXIT. Press the Enter key.
- Remove the Windows disc as well as restart your COMPUTER.
After doing that, you need to get in Safe Mode as well as remove any type of recently installed drivers. To do that, adhere to these actions:
- When the computer starts after the reboot keep pushing the F8 button on the keyboard.
- Listing of options will certainly appear. Select Safe Mode from the menu.
-
When Safe Modes starts, open Device Manager.
- Now uninstall the last drivers you set up just recently by best clicking on them and also and selecting the Uninstall device option.
- Reboot the Windows 8.1 typically and also see if you still have the blue display with the exact same mistake message. If the issue lingers, you’ll have to remove an additional lately set up driver. Repeat this step until your COMPUTER start working again
Keep in mind: After you discover the driver that is causing you this blue display you need to examine the producer’s web site for an upgraded version of it that works with your Windows operating system in order to avoid the mistake Driver Power State Failure from showing up once more.
Solution 1: Download the Latest version of GIGABYTE APP Center
Your current GIGABYTE APP Center might not be compatible with Windows 10. So go to GIGABYTE official download page to check and download the latest APP center, then install it on your computer.
IMPORTANT: Install the GIGABYTE App Center by downloading it only from the GIGABYTE official website. Only install the version that appears in the list of donwloads for your exact matching specific motherboard model.
1. Go to the GIGABYTE utility download page.
2. Search for the App Center by Motherboard.
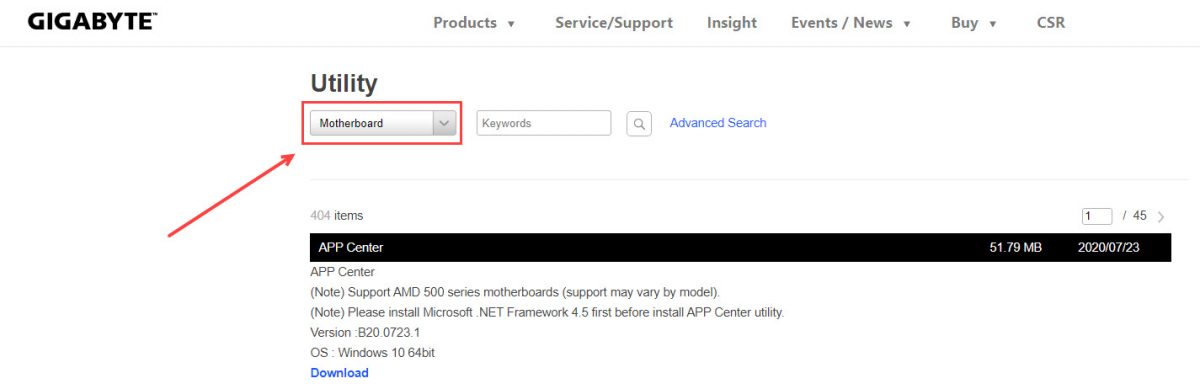
3. Enter Keywords in the search box and start searching.
Alternatively, you can choose Advanced Search (search by Socket, Chipset and Model) to find the matching App Center.
4. Click Download next to the App Center exactly for your motherboard.

5. Run the installation file and follow the on-screen instructions to install.
Note: You can either go to its Motherboard for reaching App Center. Then go to the Utility section to download the exact App Center for your computer.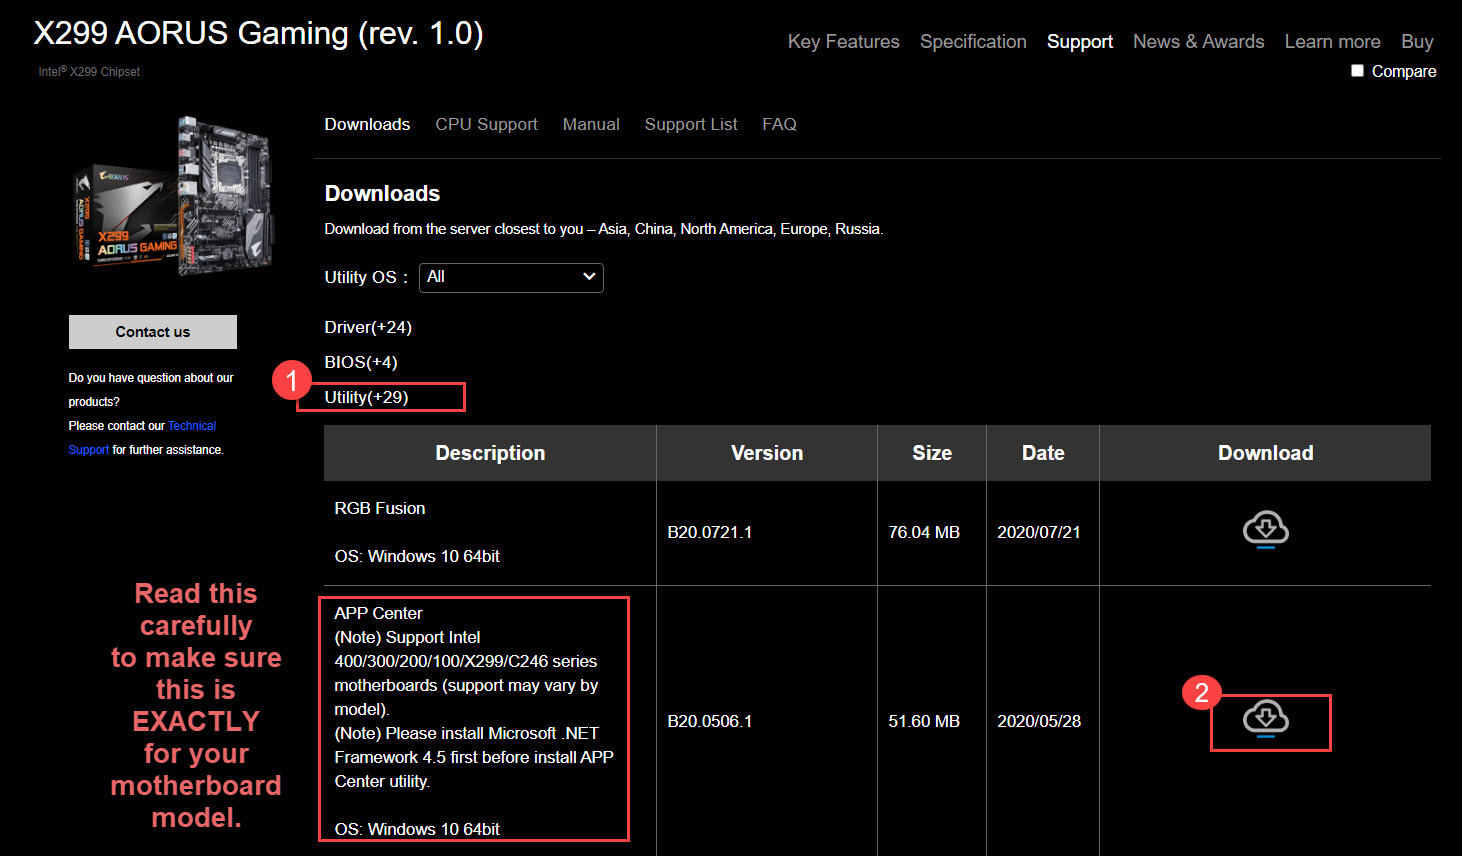
Hope this solves your This Driver can’t release to failure issue. If unfortunately this solution doesn’t do the trick for you, don’t worry. Check out our next solution below.