Как в ос windows 10 исправить ошибку kernel security check failure, 8 шагов
Содержание:
- Solution 3. Boot Windows 10 in Safe Mode
- Ошибка Kernel Security Check Failure: как исправить и почему возникает при работе Windows 10
- 2: Update available drivers
- Importance of Resolving the Kernel Security Check Failure
- Fixing “KERNEL SECURITY CHECK ERROR” on Windows
- Обновите BIOS
- Kernel Security Check Failure Error, Fixed
- Kernel Security Check Failure
- Ошибка kernel security check failure Windows 8 и 10
- Quick fix Kernel Security Check failure with BSOD error
- Проверка различных устройств
Solution 3. Boot Windows 10 in Safe Mode
You can boot into safe mode to see if the problem disappears. If the error kernel security check failure disappears, it means that the culprit is a program on your computer. You can uninstall it fix the problem.
If you don’t know how to boot Windows 10 in safe mode, please follow the detailed steps as below.
Step 1. Restart your Computer into the Advanced startup options menu.
1. Follow the two ways to open settings.
- Press Windows key + I on your keyboard to open Settings.
- Right-click the Windows Startbutton, and then select Settings.
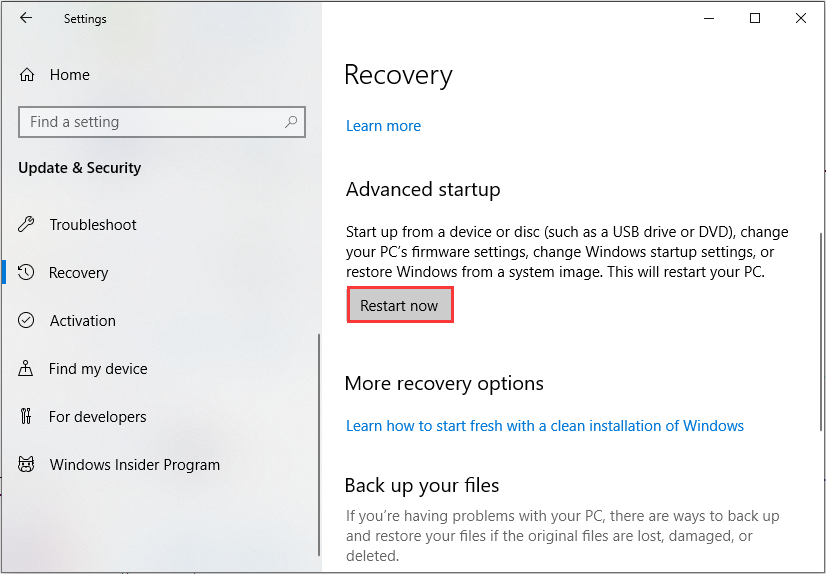
2. Select Update & Security> Recovery.
3. Under Advanced startup, select Restart now.
Step 2. Boot from Safe Mode with Networking.
- After your PC restarts to the Choose an option screen, choose Troubleshoot.
- Go to Advanced options> Startup Settings> Restart.
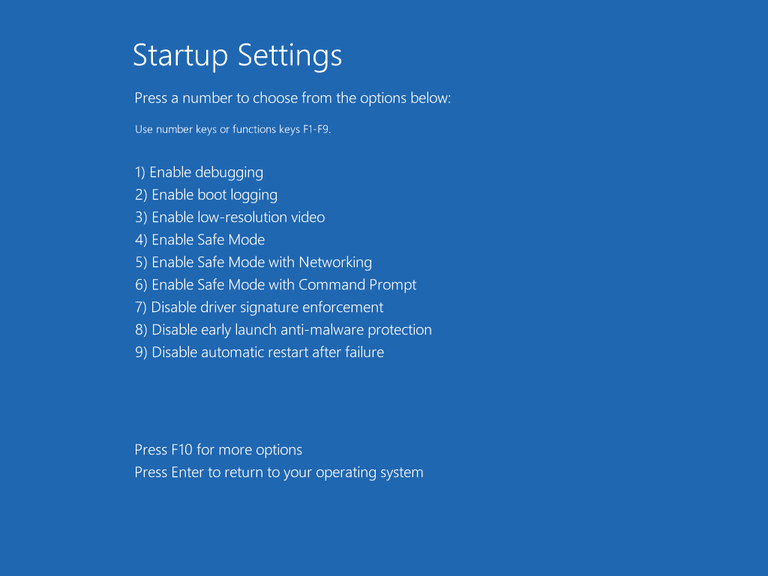
- After your PC restarts, you’ll see a list of options. Select 4or press F4to start your PC in Safe Mode. Or if you’ll need to use the Internet, select 5 or press F5 for Safe Mode with Networking.
After booting your computer in Safe Mode, you can identify if there is any software causing this problem.
If the problem doesn’t occur in the safe mode, it indicates that the problem is caused by software. You can enable your program one by one to identify it. When finished, you can uninstall the software that gives rise to kernel security check Windows 10 issue.
Ошибка Kernel Security Check Failure: как исправить и почему возникает при работе Windows 10
Каждому пользователю Windows хоть раз приходилось сталкиваться с так называемым «синим экраном смерти», он же BSOD. Его причина возникновения может быть разная, начиная с перегрева и выхода из строя компонентов, и заканчивая битыми файлами операционной системы. В Windows 10 «синий экран смерти» стал более информативным, чем на прошлых версиях операционной системы. При его появлении на экране пользователь может ознакомиться с названием ошибки и ее кодом, после чего компьютер перезагрузится и запустится вновь, если удастся избавиться от проблемы в конкретный момент времени. Некоторые ошибки Windows сама устранить не может, и среди них Kernel Security Check Failure. В рамках данной статьи мы рассмотрим, почему она появляется, и как ее исправить.
Ошибка Kernel Security Check Failure
Распространенная ошибка Kernel Security Check Failure также может отображаться кодом 0×00000139. В большинстве случаев операционная система без вмешательства со стороны пользователя не может устранить причину ее появления. Наиболее часто она возникает из-за следующих проблем в работе компьютера:
- Неактуальная версия драйверов;
- «Битые» файлы реестра;
- Версия BIOS конфликтует с программным обеспечением;
- Неполадки в работе компонентов компьютера.
Выше перечислены наиболее распространенные причины, почему появляется ошибка Kernel Security Check Failure, но на деле их гораздо больше.
Как исправить ошибку Kernel Security Check Failure
Однозначно сказать, почему появляется ошибка 0×00000139 при работе компьютера невозможно. Иногда она может не беспокоить пользователя несколько недель подряд, а в некоторых случаях синий экран с ошибкой Kernel Security Check Failure возникает каждые 10-30 минут, перезагружая компьютер.
Приведем алгоритм действий, который позволит протестировать систему, определить и устранить причину ошибки Kernel Security Check Failure.
1. Проверка жесткого диска
Чтобы протестировать жесткий диск, необходимо вызвать командную строку от имени администратора и прописать в ней команду:
Обратите внимание: Если у вас установлено несколько жестких дисков, последовательно потребуется проводить проверку для каждого из них. Команда выше проверяет только раздел, именуемый буквой C, он же чаще всего системный
При следующем старте компьютера начнется автоматическая проверка жесткого диска, которая может продлиться достаточно долго, в зависимости от объема накопителя и количества файлов на нем.
2. Проверка системных файлов
После сканирования жесткого диска на ошибки, нужно выполнить проверку системных файлов. Для этого снова потребуется запустить командную строку от имени администратора и прописать в ней следующую команду:
sfc /scannow
Данная команда позволяет проанализировать целостность системных файлов операционной системы Windows. Если в результате проверки будут найдены поврежденные файлы, утилита постарается их восстановить.
3. Тестирование оперативной памяти
Часто ошибка Kernel Security Check Failure возникает из-за проблем с оперативной памятью. Если в компьютере установлено несколько плашек ОЗУ, можно поочередно оставлять компьютер работать на одной из них и смотреть за реакцией, будет ли возникать в таком случае ошибка 0×00000139. Однако более эффективно провести полную проверку оперативной памяти и выявить проблемную плашку, если таковая имеется.
4. Устранение изменений в реестре
Сам пользователь, различные приложения, а также вирусы могут вмешиваться в работу реестра компьютера, изменяя различные параметры. Чаще всего пользователь вносит изменения в реестр взвешенно, выполняя действия на основе собственного опыта или авторитетных советов. Однако некоторые изменения реестра могут повлечь за собой ошибки, такие как Kernel Security Check Failure.
Уверенность, что ошибка 0×00000139 в работе Windows 10 не связана с изменениями в реестре, можно получить, если выполнить его восстановление из резервной копии.
5. Проблемы с драйверами
Еще одна причина, почему появляется ошибка Kernel Security Check Failure, это неактуальная версия драйверов и возникновение конфликтов между ними и операционной системой. В такой ситуации рекомендуется обновить драйвера до последних версий, скачать которые всегда можно с сайта-производителя компонента компьютера: видеокарты, материнской платы, центрального процессора и так далее.
Важно: Требуется обновить не только драйвера компонентов компьютера, но и BIOS до последней версии
2: Update available drivers
This blue screen of death error is very likely to be caused by incompatible drivers. You should verify that all your devices have the right driver, and update those that don’t. There are two ways you can get the right drivers for your hardware devices: manually or automatically.
Manual driver update – You can update your device drivers manually by going to the manufacturer’s website for your hardware devices, and searching for the most recent correct driver for each. Be sure to choose only drivers that are compatible with your variant of Windows 10.
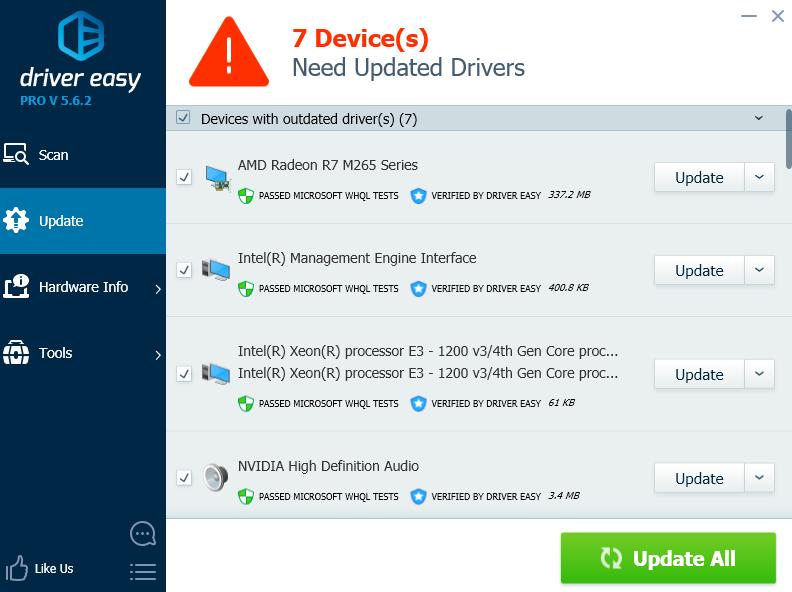
Automatic driver update. Driver Easy will automatically recognize your system and find the correct drivers for your exact video card and monitor, and your variant of Windows 10, and it will download and install them correctly
1) Download and install Driver Easy.
2) Run Driver Easy and click the Scan Now button. Driver Easy will then scan your computer and detect any problem drivers.

3) Click the Update button next to all flagged devices to automatically download and install the correct version of their drivers (you can do this with the FREE version).
Or click Update All to automatically download and install the correct version of all the drivers that are missing or out of date on your system (this requires the Pro version which comes with full support and a 30-day money back guarantee. You’ll be prompted to upgrade when you click Update All).
Importance of Resolving the Kernel Security Check Failure
The BSoD and other types of errors also known as the kernel security check error give a lot of trouble to the people and that is why resolving them at the right time becomes very crucial and important. The first and crucial aspect about the importance of resolving the kernel security failure is to make the people’s computer work properly back again.
Another aspect is to protect the internal and private storage of your computer and stop it from getting hacked or misused by anyone due to the occurrence of failures in your computer. This is crucial to make the computers virus-free and that too without wanting to install the anti-virus software back again.
Fixing “KERNEL SECURITY CHECK ERROR” on Windows
Fix #1: Check error log with Event Viewer
Using the Event Viewer tool you can troubleshoot and try to pinpoint the cause for why the error appears.
To access Event Viewer, follow these steps:
- Click Start
- Type in the search box
- Select Administrative tools from the results list
- Choose Computer Management
- Expand the Event Viewer tree from the right side
- Expand the Windows logs tree
- Select System
- Check for any error messages that may help you identify the device or the driver that’s triggering this error.If you can identify a device or driver from the error list, disable that device or driver and restart your computer to test if the error appears again.

Event log screen
Fix #2: Run Driver Verifier
The Driver Verifier utility can test all your installed drivers and could help you identify corrupt files and drivers. If the KERNEL SECURITY CHECK ERROR error is caused by a corrupt driver, the Driver Verifier tool can identify the problematic driver.
To access Driver Verifier, follow these steps:
- Start Windows
- Click start
- Type in the search box to open Command Prompt
- Right-click on the Command Prompt item from the search results list
- Click Run as Administrator
- Type in Command Prompt
- Press Enter
- Select the Create standard settings check box and then click Next
- Select the Automatically select all drivers installed on this computer option
- Click Finish
To test against specific drivers, follow these steps:
- Start Windows
- Click start
- Type in the search box
- Select Create custom settings
- Click Next
- Select everything from the Select individual settings from the full list section. If you’re running Windows 8/8.1, leave the DDI compliance checking and randomized low resource simulation unchecked.
- Select Select driver names from a list
- Click Next
- From the new list select all drivers that are not listed with Microsoft as a provider
- Click Finish
The Driver Verifier tool will now run in the background and save any error logs if the KERNEL SECURITY CHECK ERROR appears again. If the error appears, open the logs to troubleshoot the driver.

Driver verifier screen
Fix #3: Run sfc
On Windows Vista and Windows 7, it is possible to use the built-in Windows SFC(system file checker) tool to automatically scan a computer’s system files and repair them if necessary.
Here are the steps to run SFC:
- Boot from your Windows install disc
- Click on Repair your computer after selecting proper language, time and keyboard input.
- Select the Windows installation drive, which is usually , and click Next
- Choose Command Prompt when the System Recovery Options box appears
- Write the following command and press Enter afterwards:
sfc /scannow /offbootdir=D:\ /offwindir=D:\Windows\
Replace D: with the letter of the driver where Windows is installed, and D:\Windows with the Windows folder location.
Here is an example of what the PC’s console output should look like once the sfc.exe scan is complete and missing files are successfully restored:

System files restored by the SFC utility
For more information on sfc, read the sfc guide.
Fix #4: Clean boot
A clean boot of your Windows will allow you to trobleshoot if the KERNEL SECURITY CHECK ERROR appears because of a third-party device or driver you’ve recently installed.
To clean boot a Windows XP, Vista or 7 system, follow these steps:
- Start Windows
- Click Start and type in the search box or open Run > type
- Press Enter
- Go to the General tab
- Check Selective Startup radio button
- Uncheck the Load startup items check box
- Go to the Services tab
- Check Hide all Microsoft service check box
- Click Disable all
- Click OK
- Restart your computer
To clean boot a Windows 8 or 8.1 system, follow these steps:
- Follow the same steps from Windows XP/Vista/7 above
- Go to the Startup tab
- Disable all startup items
- Restart your computer

Msconfig utility screen
Fix #5: Install all pending updates
Make sure your Automatic Updates option is turned on and you have the latest updates install for your system.
Follow these steps:
- Windows Vista, 7 users can type in the search box to open Windows Updates.Windows 8 users can open the Charm Bar by pressing Windows key and the C keys and then go Settings > Change PC Settings
- Click Update and Recovery
- Click Choose how updates get installed
- Select Install updates automatically at the Important updates section
- Check Give me recommended updates the same way I receive important updates check box under Recommended updates
- Click OK

Windows Update setting screen
Обновите BIOS
Перезагрузите компьютер и войдите в настройки BIOS/UEFI. Определите текущую версию прошивки. На сайте производителя материнской карты проверьте, имеются ли более свежие прошивки для вашего BIOS/UEFI. Скачайте и установить обновление прошивки (firmware) по инструкциям на сайте производителя.
Если ошибка kernel_security_check_failure появляется при подключении к компьютеру телефона через USB кабель, это означает, что у вас установлены некорректные драйвера для вашего телефона или недостаточно напряжения на USB хабе (отключите другие USB устройства и попробуйте другой USB порт).
Kernel Security Check Failure Error, Fixed
While Windows 10 has certainly improved over the years, it still has many quirky bugs and errors, just like the kernel security check failure. Hopefully, you were able to resolve the problem with one of the methods listed above.
Delete These Windows Files and Folders to Free Up Disk Space
Need to clear disk space on your Windows computer? Here are the Windows files and folders that can be safely deleted to free up disk space.
Read Next
About The Author
Shaant Minhas
(58 Articles Published)
Shaant is a Staff Writer at MUO. A graduate in Computer Applications, he uses his passion for writing to explain complex tech in plain English. When not researching or writing, he can be found enjoying a good book, running, or hanging out with friends.
More
From Shaant Minhas
Kernel Security Check Failure
If you receive KERNEL_SECURITY_CHECK_FAILURE blue screen, here are a few things you may want to try. See which applies to your system and proceed with those suggestions.
- Run Windows Update
- Run System File Checker
- Run the Driver Verifier Manager
- Run Memory Diagnostic Tool
- Scan your Hard Disk for errors
- Troubleshoot in Clean Boot State
- Enable the Legacy Boot Policy.
If you can log in normally, good; else you will have to boot into Safe Mode, enter Advanced Startup options screen, or use the Installation Media to boot to be able to carry out these instructions.
2] Run System File Checker
You may want to also run System File Checker to replace corrupted system files if any. You may want to also physically ensure that your RAM, Hard Disk, and other hardware components and accessories are connected properly.
3] Run the Driver Verifier Manager
Run the Driver Verifier Manager to check for corrupt drivers. If need be, uninstall and reinstall or update the drivers.
4] Run Memory Diagnostic Tool
Windows 10 has a Memory Diagnostic Tool which you can use to check for possible memory problems, including testing of the Random Access Memory (RAM) on your computer. Run it and see if it throws up any issues.
5] Scan your Hard Disk for errors
Scan your Hard Disk for errors. To run Check Disk on your System Drive (C), type the following in CMD and hit Enter:
chkdsk /f C:
If required, restart your computer.
6] Troubleshoot in Clean Boot State
Boot in Safe Mode or Clean Boot State and see if the problem disappears. If the problem does not occur then you will have to manually identify the offending program or driver and uninstall it.
7] Enable the Legacy Boot Policy
If you cannot log in to your Windows computer, boot into Advanced Startup Options and open an elevated command prompt window. The process is explained there in detail.
Once at that screen, select Troubleshoot > Advanced options > Command Prompt. Using the CMD, you can access the more advanced built-in Windows tools easily.
If you wish to directly access these Advanced startup options when working on your Windows 10, you can do so via the Settings app of Windows 10 > Update & Security > Recovery > Advanced startup and click the Restart now button.
Now you will have to enable the Legacy Boot Policy. Type the following command and hit Enter:
bcdedit /set {default} bootmenupolicy legacy
Now you will be able to log into your Windows desktop or Safe Mode to carry out the troubleshooting suggestions mentioned above.
All the best!
See this post if you receive a Critical Process Died error in Windows 10.
Ошибка kernel security check failure Windows 8 и 10
Ошибка kernel security check failure Windows 10 – очень заковыристая неприятность по нескольким причинам. Прежде всего, эту проблему могут спровоцировать, как программное обеспечение, так как конфликтная ситуация с каким-либо оборудованием. Во-вторых, синий экран kernel security check failure, падлюка хитрый – он может напоминать о своем существовании по несколько раз в день, а потом усыпить бдительность пользователя, делая перерыв на пару суток.
Тем не менее, ошибка kernel security check failure Windows есть, даже если она временно не показывает себя, а значит, эта неприятность, тихо и незаметно продолжает свою разрушительную деятельность.
Тем не менее, мы тоже не пальцем деланные, поэтому с радостью сообщаем вам о том, что может обозначать код ошибки kernel security check failure:
- Поздравляем – версия BIOS вашего компьютера окончательно устарела
- Что-то из установленного в ПК очень не желает работать в общей системе оборудования, короче буянит и провоцирует на конфликт.
- Драйвера потеряли свою актуальность.
- Системный реестр испытывает серьезные проблемы со своей исправностью.
Фу.. с самым сложным разобрались. Остался последний и очень простой этап – понять, как исправить kernel security check failure Windows 10.
Рецептура лечения
Что делать — kernel security check failure Windows 8? Что делать, что делать..исправлять!
И начнем мы процедуру лечения ошибки kernel security check failure Windows 10 с БИОСа. Сделать это достаточно просто:
- Узнать очень важную информацию о том – кто же произвел материнскую плату, которая используется на вашем ПК? Сделать это можно с помощью документации компьютера или воспользовавшись специальной программкой «Speccy», которую можно скачать из интернета на шару.
- Дальше – скачивание и установка оригинального ПО, которое выполнит обновление BIOS в автоматическом режиме. Например, для материнки от ASUS это будет «AsusUpdate», а для MSI – «MSILiveUpdate», ну и так далее в том же духе.
Не помогло? Ну и фиг с ним – у нас в загашнике есть еще способы борьбы с этой неприятностью, известной как синий экран kernel security check failure! Было бы вполне логично перейти к проверке актуальных версий драйверов. Так и поступим. В этой ситуации рекомендуется делать все своими ручками, а не надеется на программы, которые иногда дают сбой. Поэтому подкладываем подушечку под пятую точку и приступаем:
- Через «Пуск» переходим в «диспетчер задач» (Компьютер – система -..).
- Поочередно нажимаем на каждом устройстве правой кнопкой мышки, переходим в настройки и пытаемся обновить драйвера. Понимаю, долго. Понимаю, нудно. Но надо!
Кстати при установке Windows 10 – «kernel security check failure» — вполне распространенное явление. Все дело в том, что последняя операционка от Microsoft достаточно требовательна к ресурсам ПК, поэтому некоторые модели могут просто не потянуть ее. Может не хватить памяти, например. Что делать? Да забить на такую инсталляцию, так как семерка и восьмерка еще не потеряли своей актуальности. Но если очень надо – вперед в магазин для апгрейда своего PC!
Перейдем к исправлению реестра системы, так как он вполне может быть такой себе первопричиной этой неприятной ситуации. Что делаем:
- Открываем командную строку и вбиваем «regedit».
- Терпеливо ждем результата.
- Делаем контрольный выстрел с помощью одной из полезных программ, например, CCleaner или Ashampoo Optimizer.
Последний вариант возникновения ошибки kernel security check failure Windows – что-то пошло не так при установке нового оборудования. Если это внешнее устройство (например, принтер, камера и так далее), то его проще отключить и выполнить диагностику работоспособности компьютера. Собственно эту неприятность может вызвать абсолютно любая установка:
- Блок питания не справляется с характеристиками новой графической платы.
- Процессор не предназначен для используемой материнки.
- Планка памяти не соответствует необходимым параметрам.
То есть, прежде всего, необходимо изучить всю техническую документацию, прежде чем начинать выполнять самостоятельный апгрейд. А лучше доверять такую работу специалистам. Собственно, это все, что известно на сегодня про код ошибки kernel security check failure.
Quick fix Kernel Security Check failure with BSOD error
Here are the steps about how to boot Windows 10/8 PC into Safe Mode:
1. Press Win + R keys to open Run dialog > Type: msconfig and hit Enter.
2. Go to Boot option > Select Safe boot > OK.
If you want to boot into Safe Mode with the internet connection, select Network option under Safe boot category.
3. Click Restart so to boot your computer into Safe Mode now.
If the Kernel Security Check failure disappears after booting PC into Safe Mode, you need to check the offending programs in your PC or uninstall and update necessary drivers.
If the error still exists in Safe Mode, it’s very likely that the RAW or hard drive got something wrong.
Note: 1. If Safe Mode doesn’t help, you can directly boot PC into desktop and follow the offered solutions to fix Kernel BSOD error.
2. If you can’t boot PC into the desktop, try hard reboot:
- Press and hold the power button on your PC till it powers off > Restart PC by pressing the power button.
- Repeat the steps till you see Please wait comes out.
- Click See advanced repair options > Troubleshoot > Advanced options.
- Choose Startup Settings > Restart > Press F4, F5, F6 to try 4, 5, 6 options so to boot your PC into desktop.
Проверка различных устройств
Иногда ошибка возникает из-за конфликта BIOS с новыми деталями. Например, если вы решили обновить свой компьютер и купили дополнительные планки оперативной памяти. Из-за их несовместимости с материнской платой система может выдавать «синий экран смерти». Попробуйте извлечь все новые детали, и запустить компьютер в старой конфигурации. Если загрузка будет удачной, то проблему вы нашли.
Если же ничего нового не покупали, но ошибки периодически появляются, то всё равно попробуйте вытащить линейки ОЗУ, аккуратно протереть их и вставить на место. Кроме этого, проверьте контакты подключения винчестера и видеокарты.
Тестируем оперативную память
Также рекомендуется запустить поиск ошибок на программном уровне. Для этого выполните следующие действия.
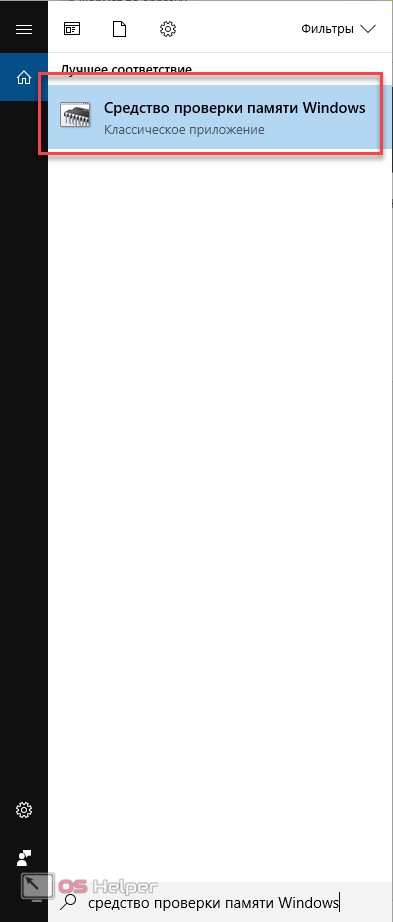
- Кликните по лупе на панели задач.
- В появившемся окне введите «средство проверки памяти». Результаты будут появляться во время набора каждой буквы. Поэтому нужно дописать фразу до конца. Кликните по выделенной программе.
- Если вы сделали всё правильно, то откроется следующее приложение.
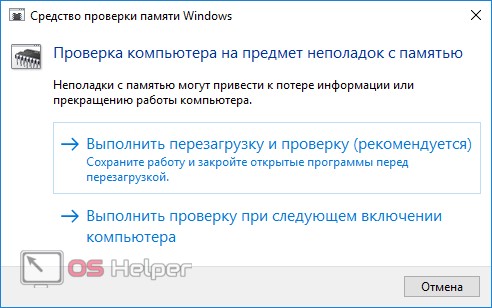
- Выберете любой из предложенных вариантов. Рекомендуется первый.
Обновление драйверов
Подобные проблемы с компьютером могут наблюдаться из-за неподходящих драйверов. Самое интересное то, что такой конфликт может возникать после обновления.
Очень часто различные производители выпускают бета-версии драйверов для своей продукции. И они не всегда работают корректно. Такие тестирования и проводятся для выявления проблем.
У вас всего два пути:
- в случае обновления драйвера откатиться к старой версии;
- попробовать установить новые версии.
Проверка температуры
«Синий экран смерти» может появляться из-за критических температур. Благодаря этому операционная система пытается экстренно завершить работу, чтобы ваши устройства не сгорели из-за перегрева.
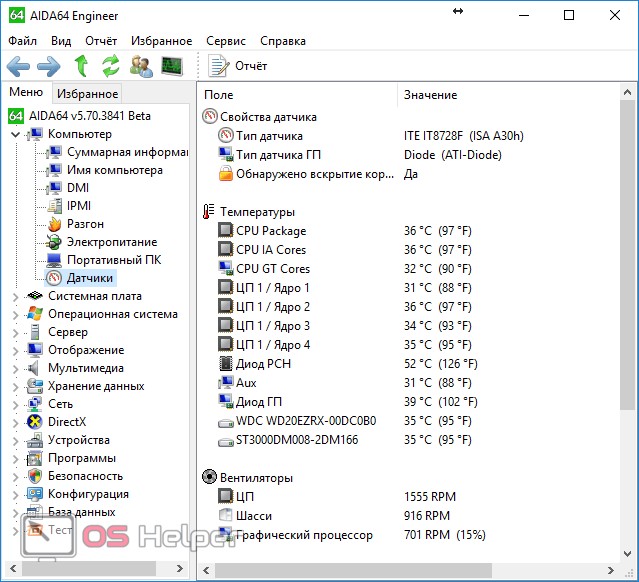
Многие пользователи, когда делают апгрейд компьютера, забывают про систему охлаждения. Например, если вы купили новый мощный процессор, то к нему обязательно нужно покупать кулер с большим радиатором. Желательно, чтобы там были еще и медные трубки отвода тепла.
Идеальный вариант для полноценного охлаждения процессора выглядит вот так.