Что такое ahk и для чего его используют? как скачать и установить этот язык программирования?
Содержание:
- Introduction and Simple Examples
- Joystick
- Основные возможности
- Main Window
- AutoHotkey автоматизация процессов 1.1.33.00
- 4 — Running Programs & Websites
- Alt-Tab Hotkeys
- Send variants
- Hotkeys, Hotstrings, and Remapping
- How do I put my hotkeys and hotstrings into effect automatically every time I start my PC?
- I’m having trouble getting my mouse buttons working as hotkeys. Any advice?
- How do I detect the double press of a key or button?
- How can a hotkey or hotstring be made exclusive to certain program(s)? In other words, I want a certain key to act as it normally does except when a specific window is active.
- How can a prefix key be made to perform its native function rather than doing nothing?
- The Top of the Script (the Auto-execute Section)
- Автоматизируйте ваши повторяющиеся задачи с помощью AutoHotkey
- Имитируем клики мышкой
- Returning Values to Caller
- Что такое AutoHotkey
Introduction and Simple Examples
Hotkeys are sometimes referred to as shortcut keys because of their ability to easily trigger an action (such as launching a program or keyboard macro). In the following example, the hotkey Win+N is configured to launch Notepad. The pound sign stands for Win, which is known as a modifier key:
#n::
Run Notepad
return
In the final line above, serves to finish the hotkey. However, if a hotkey needs to execute only a single line, that line can be listed to the right of the double-colon. In other words, the is implicit:
#n::Run Notepad
To use more than one modifier with a hotkey, list them consecutively (the order does not matter). The following example uses to indicate Ctrl+Alt+S:
^!s::
Send Sincerely,{enter}John Smith  ; This line sends keystrokes to the active (foremost) window.
return
Joystick
Joy1 through Joy32: The buttons of the joystick. To help determine the button numbers for your joystick, use this . Note that hotkey prefix symbols such as ^ (control) and + (shift) are not supported (though can be used as a substitute). Also note that the pressing of joystick buttons always «passes through» to the active window if that window is designed to detect the pressing of joystick buttons.
Although the following Joystick control names cannot be used as hotkeys, they can be used with :
- JoyX, JoyY, and JoyZ: The X (horizontal), Y (vertical), and Z (altitude/depth) axes of the joystick.
- JoyR: The rudder or 4th axis of the joystick.
- JoyU and JoyV: The 5th and 6th axes of the joystick.
- JoyPOV: The point-of-view (hat) control.
- JoyName: The name of the joystick or its driver.
- JoyButtons: The number of buttons supported by the joystick (not always accurate).
- JoyAxes: The number of axes supported by the joystick.
- JoyInfo: Provides a string consisting of zero or more of the following letters to indicate the joystick’s capabilities: Z (has Z axis), R (has R axis), U (has U axis), V (has V axis), P (has POV control), D (the POV control has a limited number of discrete/distinct settings), C (the POV control is continuous/fine). Example string: ZRUVPD
Multiple Joysticks: If the computer has more than one joystick and you want to use one beyond the first, include the joystick number (max 16) in front of the control name. For example, 2joy1 is the second joystick’s first button.
Note: If you have trouble getting a script to recognize your joystick, one person reported needing to specify a joystick number other than 1 even though only a single joystick was present. It is unclear how this situation arises or whether it is normal, but experimenting with the joystick number in the can help determine if this applies to your system.
See Also:
- Joystick remapping: Methods of sending keystrokes and mouse clicks with a joystick.
- : Using a joystick as a mouse.
Основные возможности
- автоматизация различных действий путем эмуляции нажатия определенных клавиш на мыши и клавиатуре;
- написание или запись макросов с использованием рекордера;
- назначение горячих клавиш;
- быстрая расшифровка аббревиатур;
- создание произвольных форм для ввода информации;
- изменение назначения любых клавиш;
- обработка сигналов, переданных внешними устройствами управления;
- преобразование скриптов;
- управление громкостью и другими настройками звуковых карт;
- выполнение мониторинга системы;
- изменение содержимого в буфере обмена;
- отображение на экране надписей и диалоговых окон;
- автоматизация действий в играх;
- любые операции с текстовыми файлами и др.
Плюсы и минусы
Плюсы:
- автоматический запуск практически любых операций на ПК;
- встроенный скриптовый язык;
- переназначение любых клавиш;
- поддержка разных устройств для вывода.
Минусы:
некоторые сложности в освоении.
Похожие программы
Auto-Clicker. Программа для запоминания и последующего воспроизведения всех действий компьютерной мыши. Записанные действия в ней можно повторять произвольное количество раз, настраивая скорость их воспроизведения.
Macro Recorder. Приложение, которое может автоматизировать все рутинные процессы на компьютере. С его помощью можно создавать макросы, которые будут самостоятельно запускать необходимые программы, выполнять клики мышкой, вводить текст и т. д.
Как пользоваться приложением
Для того чтобы с помощью программы назначить автоматическое выполнение какого-либо действия, нужно создать скрипт. Он представляет собой всплывающее окно с пометкой «Я рогалег». С этой целью используем команду MsgBox, которую можно вызвать любым текстом. Надпись и команду необходимо вписать в любой текстовый редактор, так как сама программа как такового отдельного окна не имеет. Далее сохраняем файл, обязательно указав для него расширение «ahk». Скрипт будет выполнен при нажатии на него двойным щелчком.
Выполнение скрипта
При запуске скрипта появится значок «Autohotkey». Нажав на него правой кнопкой, вы сможете выбрать необходимые команды.
Выбор команд
Код, который должен автоматически выполняться при запуске скрипта, помещается вверху файла. Идентификаторы нужно указывать для горячих клавиш.
Рассмотрим, как это действует, на примере назначения автоматического запуска блокнота Notepad++ при нажатии определенных клавиш.
Для начала набираем «#n:: Run notepad++» и сохраняем файл. Дважды щелкаем по нему и набираем команду «Win+n». В области уведомления появится значок, а программа будет запущена при нажатии указанной комбинации клавиш.
В команде значок «#n» определяет кнопки, «::» — разделяет обозначения самих клавиш от команд. Остальные базовые кнопки обозначаются таким образом:
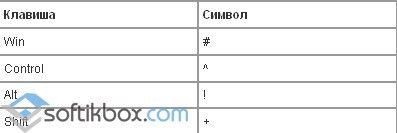 Обозначения кнопок
AutoHotkey поможет легко и быстро выполнять любые операции и действия, которые вам приходится часто производить на своем ПК.
Main Window
The script’s main window is usually hidden, but can be shown via the or one of the commands listed below to gain access to information useful for debugging the script. Items under the View menu control what the main window displays:
- Lines most recently executed — See ListLines.
- Variables and their contents — See ListVars.
- Hotkeys and their methods — See ListHotkeys.
- Key history and script info — See KeyHistory.
Known issue: Keyboard shortcuts for menu items do not work while the script is displaying a message box or other dialog.
The built-in variable contains the unique ID (HWND) of the script’s main window.
Closing this window with WinClose (even from another script) causes the script to exit, but most other methods just hide the window and leave the script running.
Minimizing the main window causes it to automatically be hidden. This is done to prevent any owned windows (such as GUI windows or certain dialog windows) from automatically being minimized, but also has the effect of hiding the main window’s taskbar button. To instead allow the main window to be minimized normally, override the default handling with OnMessage. For example:
; This prevents the main window from hiding on minimize:
OnMessage(0x0112, Func("PreventAutoMinimize")) ; WM_SYSCOMMAND = 0x0112
OnMessage(0x0005, Func("PreventAutoMinimize")) ; WM_SIZE = 0x0005
; This prevents owned GUI windows (but not dialogs) from automatically minimizing:
OnMessage(0x0018, Func("PreventAutoMinimize"))

PreventAutoMinimize(wParam, lParam, uMsg, hwnd) {
    if (uMsg = 0x0112 && wParam = 0xF020 && hwnd = A_ScriptHwnd) { ; SC_MINIMIZE = 0xF020
        WinMinimize
        return 0 ; Prevent main window from hiding.
    }
    if (uMsg = 0x0005 && wParam = 1 && hwnd = A_ScriptHwnd) ; SIZE_MINIMIZED = 1
        return 0 ; Prevent main window from hiding.
    if (uMsg = 0x0018 && lParam = 1) ; SW_PARENTCLOSING = 1
        return 0 ; Prevent owned window from minimizing.
}
Main Window Title
The title of the script’s main window is used by the #SingleInstance and Reload mechanisms to identify other instances of the same script. Changing the title prevents the script from being identified as such. The default title depends on how the script was loaded:
| Loaded From | Title Expression | Example |
|---|---|---|
| .ahk file | E:\My Script.ahk — AutoHotkey v1.1.33.09 | |
| Main resource (compiled script) | E:\My Script.exe | |
| Any other resource | E:\My AutoHotkey.exe — *BUILTIN-TOOL.AHK |
The following code illustrates how the default title could be determined by the script itself (but the actual title can be retrieved with WinGetTitle):
title := A_ScriptFullPath
if !A_IsCompiled
    title .= " - AutoHotkey v" A_AhkVersion
; For the correct result, this must be evaluated by the resource being executed,
; not an #include (unless the #include was merged into the script by Ahk2Exe):
else if SubStr(A_LineFile, 1, 1) = "*" && A_LineFile != "*#1"
    title .= " - " A_LineFile
AutoHotkey автоматизация процессов 1.1.33.00
 AutoHotkey — бесплатная программа с открытым исходным кодом для создания макросов и автоматизации, позволяющая упростить повторяющиеся задачи. Она поддерживает собственный язык программирования сценариев (скриптов), приспособленный к лёгкому назначению и переназначению горячих клавиш.Системные требования:Windows XP/Vista/7/8/8.1/10Торрент AutoHotkey автоматизация процессов 1.1.33.00 подробно:Возможности программы:·Автоматизировать почти все процессы лишь нажатием клавиши или кликом мыши. Вы можете писать макросы вручную или с использованием макрорегистраторов.·Задавать «горячие» клавиши для клавиатуры, джойстика и мыши. Практически любая клавиша, кнопка или комбинация может стать «горячей» клавишей.·Использовать автозамену при печатании. Например, аббревиатура «btw» может автоматически заменяться на «by the way».·Создавать пользовательские формы ввода данных, пользовательские интерфейсы и меню. Чтобы получить дальнейшую информацию, см. раздел, посвященный GUI.·Переназначать клавиши и кнопки на клавиатуре, джойстике или мыши.·Передавать сигналы ручного пульта дистанционного управления через клиентский скрипт WinLIRC.·Пользоваться уже существующими скриптами AutoIt v2, а также добавлять в них новые возможности.·Конвертировать любой скрипт в EXE-файл, который затем можно запустить даже на компьютерах, где не установлен AutoHotkey.·Изменение громкости, приглушение звука (mute) и другие настройки любой звуковой карты.·Возможность делать окна прозрачными, устанавливать поверх других окон или изменять их форму.·Использование джойстика или клавиатуры в качестве мыши.·Мониторинг вашей системы. Например, возможность закрывать нежелательные окна при их появлении.·Чтение и изменение содержимого буфера обмена, включая имена файлов, скопированные из окна Explorer.·Запрет или замена собственных «быстрых» клавиш Windows, таких, как Win+E и Win+R.·Уменьшение травм от работы на клавиатуре путем замены комбинации Alt-Tab на другие клавиши, ролик или кнопки мыши.·Настройка меню трея собственными пиктограммами, всплывающими подсказками, пунктами меню и субменю.·Отображение диалоговых окон, подсказок и всплывающих меню, обеспечивающих взаимодействие с пользователем.·Выполнение заданных сценарием операций в ответ на завершение работы системы или конец сеанса.·Определение продолжительности простоя в работе пользователя. Например, запуск объемных задач CPU только в отсутствие пользователя.·Автоматизация игровых действий путем распознавания изображений и цветов пикселов.·Более простое, чем в других языках, чтение, запись и анализ текстовых файлов.·Выполнение операций с файлами с использованием подстановочных символов.·Работа с реестром и INI-файлами.Что нового:·Added #ErrorStdOut Encoding parameter.·Added /ErrorStdOut=Encoding command line switch.·Added #Warn Unreachable (warning mode).·Added #Requires AutoHotkey vVersion (directive).·Added detection of program-terminating SEH exceptions, to display an error dialog.·Fixed a possible bug where Input causes undefined behaviour. ·Fixed WinKill.·Fixed A_WinDir to always return the system Windows directory.·Fixed FileGetShortcut/FileCreateShortcut to return and accept negative icon indices without modification.·Fixed InputBox Locale option to not focus the Cancel button.·Fixed menu bar keyboard shortcuts not working when GUI has no controls.·Fixed LoadPicture to use 256×256 graphic when available in a DLL/EXE.·Fixed DBGp stderr copy mode to not suppress error dialogs.·Fixed ControlGet Line setting ErrorLevel=1 when line is just empty.Fixed Send causing unwanted hotkey buffering.
Скриншоты AutoHotkey автоматизация процессов 1.1.33.00 торрент:
Скачать AutoHotkey автоматизация процессов 1.1.33.00 через торрент:
autohotkey-1_1_33_00.torrent (cкачиваний: 54)
4 — Running Programs & Websites
mspaint.exe, calc.exe, script.ahkRunhttps://www.autohotkey.com/
; Run a program. Note that most programs will require a FULL file path:
Run, %A_ProgramFiles%\Some_Program\Program.exe

; Run a website:
Run, https://www.autohotkey.com
There are some other advanced features as well, such as command line parameters and CLSID. If you want to learn more about that stuff, visit the Run page.
Here are a few more samples:
; Several programs do not need a full path, such as Windows-standard programs:
Run, notepad.exe
Run, mspaint.exe

; Run the "My Documents" folder using a :
Run, %A_MyDocuments%

; Run some websites:
Run, https://www.autohotkey.com
Run, https://www.google.com
For more in-depth information and examples, check out the Run page.
Alt-Tab Hotkeys
Alt-Tab hotkeys simplify the mapping of new key combinations to the system’s Alt-Tab hotkeys, which are used to invoke a menu for switching tasks (activating windows).
Each Alt-Tab hotkey must be either a single key or a combination of two keys, which is typically achieved via the ampersand symbol (&). In the following example, you would hold down the right Alt and press J or K to navigate the alt-tab menu:
RAlt & j::AltTab
RAlt & k::ShiftAltTab
AltTab and ShiftAltTab are two of the special commands that are only recognized when used on the same line as a hotkey. Here is the complete list:
AltTab: If the alt-tab menu is visible, move forward in it. Otherwise, display the menu (only if the hotkey is a combination of two keys; otherwise, it does nothing).
ShiftAltTab: Same as above except move backward in the menu.
AltTabMenu: Show or hide the alt-tab menu.
AltTabAndMenu: If the alt-tab menu is visible, move forward in it. Otherwise, display the menu.
AltTabMenuDismiss: Close the Alt-tab menu.
To illustrate the above, the mouse wheel can be made into an entire substitute for Alt-tab. With the following hotkeys in effect, clicking the middle button displays the menu and turning the wheel navigates through it:
MButton::AltTabMenu
WheelDown::AltTab
WheelUp::ShiftAltTab
To cancel the Alt-Tab menu without activating the selected window, press or send Esc. In the following example, you would hold the left Ctrl and press CapsLock to display the menu and advance forward in it. Then you would release the left Ctrl to activate the selected window, or press the mouse wheel to cancel. Define the window group as shown below before running this example.
LCtrl & CapsLock::AltTab
#IfWinExist ahk_group AltTabWindow  ; Indicates that the alt-tab menu is present on the screen.
*MButton::Send {Blind}{Escape}  ; The * prefix allows it to fire whether or not Alt is held down.
#If
If the script sent (such as to invoke the Alt-Tab menu), it might also be necessary to send as shown in the example further below.
General Remarks
Currently, all special Alt-tab actions must be assigned directly to a hotkey as in the examples above (i.e. they cannot be used as though they were commands). They are not affected by #IfWin or #If.
An alt-tab action may take effect on key-down and/or key-up regardless of whether the keyword is used, and cannot be combined with another action on the same key. For example, using both and is unsupported.
Custom alt-tab actions can also be created via hotkeys. As the identity of the alt-tab menu differs between OS versions, it may be helpful to use a window group as shown below. For the examples above and below which use , this window group is expected to be defined in the . Alternatively, can be replaced with the appropriate for your system.
GroupAdd AltTabWindow, ahk_class MultitaskingViewFrame  ; Windows 10
GroupAdd AltTabWindow, ahk_class TaskSwitcherWnd  ; Windows Vista, 7, 8.1
GroupAdd AltTabWindow, ahk_class #32771  ; Older, or with classic alt-tab enabled
In the following example, you would press F1 to display the menu and advance forward in it. Then you would press F2 to activate the selected window, or press Esc to cancel:
*F1::Send {Alt down}{tab} ; Asterisk is required in this case.
!F2::Send {Alt up}  ; Release the Alt key, which activates the selected window.
#IfWinExist ahk_group AltTabWindow
~*Esc::Send {Alt up}  ; When the menu is cancelled, release the Alt key automatically.
;*Esc::Send {Esc}{Alt up}  ; Without tilde (~), Escape would need to be sent.
#If
Send variants
Send: By default, Send is synonymous with SendEvent; but it can be made a synonym for SendInput or SendPlay via SendMode.
SendRaw: Similar to Send, except that all characters in Keys are interpreted and sent literally. See for details.
SendInput and SendPlay : SendInput and SendPlay use the same syntax as Send but are generally faster and more reliable. In addition, they buffer any physical keyboard or mouse activity during the send, which prevents the user’s keystrokes from being interspersed with those being sent. SendMode can be used to make Send synonymous with SendInput or SendPlay. For more details about each mode, see and below.
SendEvent : SendEvent sends keystrokes using the same method as the pre-1.0.43 Send command. The rate at which keystrokes are sent is determined by SetKeyDelay.
Hotkeys, Hotstrings, and Remapping
How do I put my hotkeys and hotstrings into effect automatically every time I start my PC?
There are several ways to make a script (or any program) launch automatically every time you start your PC. The easiest is to place a shortcut to the script in the Startup folder:
- Find the script file, select it, and press Ctrl+C.
- Press Win+R to open the Run dialog, then enter and click OK or Enter. This will open the Startup folder for the current user. To instead open the folder for all users, enter (however, in that case you must be an administrator to proceed).
- Right click inside the window, and click «Paste Shortcut». The shortcut to the script should now be in the Startup folder.
The left and right mouse buttons should be assignable normally (for example, is the Win+LeftButton hotkey). Similarly, the middle button and the turning of the mouse wheel should be assignable normally except on mice whose drivers directly control those buttons.
The fourth button (XButton1) and the fifth button (XButton2) might be assignable if your mouse driver allows their clicks to be seen by the system. If they cannot be seen — or if your mouse has more than five buttons that you want to use — you can try configuring the software that came with the mouse (sometimes accessible in the Control Panel or Start Menu) to send a keystroke whenever you press one of these buttons. Such a keystroke can then be defined as a hotkey in a script. For example, if you configure the fourth button to send Ctrl+F1, you can then indirectly configure that button as a hotkey by using in a script.
If you have a five-button mouse whose fourth and fifth buttons cannot be seen, you can try changing your mouse driver to the default driver included with the OS. This assumes there is such a driver for your particular mouse and that you can live without the features provided by your mouse’s custom software.
Use as follows:
~Ctrl::
    if (A_ThisHotkey = A_PriorHotkey && A_TimeSincePriorHotkey < 200)
        MsgBox double-press
return
How can a hotkey or hotstring be made exclusive to certain program(s)? In other words, I want a certain key to act as it normally does except when a specific window is active.
The preferred method is #IfWinActive. For example:
#IfWinActive, ahk_class Notepad
^a::MsgBox You pressed Control-A while Notepad is active.
How can a prefix key be made to perform its native function rather than doing nothing?
Consider the following example, which makes Numpad0 into a prefix key:
Numpad0 & Numpad1::MsgBox, You pressed Numpad1 while holding down Numpad0.
Now, to make Numpad0 send a real Numpad0 keystroke whenever it wasn’t used to launch a hotkey such as the above, add the following hotkey:
$Numpad0::Send, {Numpad0}
The $ prefix is needed to prevent a warning dialog about an infinite loop (since the hotkey «sends itself»). In addition, the above action occurs at the time the key is released.
The Top of the Script (the Auto-execute Section)
After the script has been loaded, it begins executing at the top line, continuing until a Return, Exit, hotkey/hotstring label, or the physical end of the script is encountered (whichever comes first). This top portion of the script is referred to as the auto-execute section.
Note: While the script’s first hotkey/hotstring label has the same effect as return, other hotkeys and labels do not.
If the script is not persistent, it will terminate after the auto-execute section has completed. Otherwise, it will stay running in an idle state, responding to events such as hotkeys, hotstrings, , custom menu items, and timers. A script is automatically persistent if it contains hotkeys, hotstrings, OnMessage() or GUI, and in a few other cases. The #Persistent directive can also be used to explicitly make the script persistent.
Every thread launched by a hotkey, hotstring, menu item, , or timer starts off fresh with the default values for the following attributes as set in the auto-execute section. If unset, the standard defaults will apply (as documented on each of the following pages): AutoTrim, CoordMode, Critical, DetectHiddenText, DetectHiddenWindows, FileEncoding, ListLines, SendLevel, SendMode, SetBatchLines, SetControlDelay, SetDefaultMouseSpeed, SetFormat, SetKeyDelay, SetMouseDelay, SetRegView, SetStoreCapsLockMode, SetTitleMatchMode, SetWinDelay, StringCaseSense, and Thread.
If the auto-execute section takes a long time to complete (or never completes), the default values for the above settings will be put into effect after 100 milliseconds. When the auto-execute section finally completes (if ever), the defaults are updated again to be those that were in effect at the end of the auto-execute section. Thus, it’s usually best to make any desired changes to the defaults at the top of scripts that contain hotkeys, hotstrings, timers, or custom menu items. Also note that each thread retains its own collection of the above settings. Changes made to those settings will not affect other threads.
Автоматизируйте ваши повторяющиеся задачи с помощью AutoHotkey
AutoHotkey способен на многое, и сказать, что этот урок едва царапает поверхность, было бы преуменьшением. В прошлом мы рассмотрели много важных скриптов AutoHotkey, и есть много других, которые могут сделать вашу жизнь проще.
Умение создавать собственные сценарии AutoHotkey также является отличным навыком, хотя стоит проверить руководство по сочетанию клавиш Windows Ultimate.
Сочетания клавиш Windows 101: полное руководство
Сочетания клавиш Windows 101: полное руководствоСочетания клавиш могут сэкономить часы времени. Освойте универсальные сочетания клавиш Windows, приемы клавиатуры для конкретных программ и несколько других советов, чтобы ускорить вашу работу.
Прочитайте больше
чтобы увидеть, если ярлык, который вы хотите сделать, уже существует!
Узнайте больше о: AutoHotkey, компьютерная автоматизация, сочетания клавиш.
Имитируем клики мышкой
С кликами мышкой работать несколько сложнее, чем с использованием клавиатуры, так как здесь помимо кнопок есть еще и определенное месторасположение курсора, которое нужно указывать. В связи с этим пользователь сначала должен определить координаты X и Y того места на экране, куда должно отправляться созданное событие. Делается это при помощи встроенной в программу утилиты под названием Active Window Info.
1. Для начала вам следует запустить саму программу из трея на заранее открытом скрипте. Также вы можете просто кликнуть меню «Пуск», выбрать «Все программы» и там в меню «AutoHotKey» выбрать «Active Window Info». Сразу стоит сказать о том, что данное окно будет автоматически располагаться поверх остальных, что требуется для удобства работы с утилитой.

2. Запустите подопытное окно программы. Для этого нужно кликнуть по заголовку или же использовать стандартную комбинацию клавиш «Alt+Tab».
3. Перемещайте курсор в то место, где нужно будет осуществлять нужное вам событие, после чего посмотрите уже в окно Active Window Info. Теперь записывайте координаты, которые показаны в окне этой программы (их можно найти в строчке «On Screen» или же в строке «In Active Window») в зависимости от того, какая область конкретно на данный момент вас интересует.
Стоит отметить тот факт, что у пользователей Windows XP есть возможность использования комбинации клавиш «Shift+Alt+Tab», при помощи которой окно Window Spy замораживается, а пользователь переходит к нему для копирования нужных цифр.
4. Ставьте полученные вами координаты в скрипте после команды «MouseClick», при этом вставлять нужно только через запятую и после того, как будет обозначена кнопка мыши.
Выглядеть все это может примерно так:
В данном случае «MouseClick» – это команда, которая предназначается для щелчков мыши при помощи AutoHotKey, но для ее нормальной работы нужно будет задать также три параметра через запятую. Первый указывает кнопку мыши (можно писать Left или Right целиком, а можно просто использовать буквы L и R. M указывает на необходимость клика по скроллу). Остальные параметры представляют собой координаты X и Y того места на экране, в которое нужно будет кликнуть.
Также есть команда «MouseMove», при помощи которой курсор просто перемещается в определенную область на экране. Пользоваться ей гораздо проще, ведь нужно просто ввести команду и указать координаты, например:
Помимо всего прочего, программа может использоваться для перетаскивания мышью каких-либо объектов, что осуществляется при использовании команды «MouseClickDrag». В этой команде уже нужно будет вводить сразу пять параметров, первый из которых представляет собой клик нужной кнопкой мыши, второй и третий включают в себя стартовые координаты, а четвертый и пятый – последние, то есть то место, где мышка должна быть отпущена.
Команда может выглядеть примерно следующим образом:
Таким образом, вы можете экспериментировать с самыми разнообразными командами, и доводить автоматизм различных процедур до самых невероятных вершин.
Returning Values to Caller
As described in , a function may optionally return a value to its caller.
Test := returnTest()
MsgBox % Test

returnTest() {
    return 123
}
If you want to return extra results from a function, you may also use :
returnByRef(A,B,C)
MsgBox % A "," B "," C

returnByRef(ByRef val1, ByRef val2, ByRef val3)
{
    val1 := "A"
    val2 := 100
    val3 := 1.1
    return
}
: and can be used to return multiple values or even named values:
Test1 := returnArray1()
MsgBox % Test1 "," Test1

Test2 := returnArray2()
MsgBox % Test2 "," Test2

Test3 := returnObject()
MsgBox % Test3.id "," Test3.val

returnArray1() {
    Test :=
    return Test
}

returnArray2() {
    x := 456
    y := "EFG"
    return
}

returnObject() {
    Test := {id: 789, val: "HIJ"}
    return Test
}
Что такое AutoHotkey
Скрипты AutoHotkey — отличный способ автоматизировать некоторые действия на компьютере, но на первый взгляд эта программа может показаться сложной. Не волнуйтесь — начать гораздо проще, чем кажется! Читайте дальше, чтобы увидеть как пользоваться AutoHotkey.
Программа AutoHotkey позволяет создавать макросы и скрипты выполняющие самые разнообразные действия, которые можно привязать к любым клавишам. Программа отлично подходит для автоматизации и ускорения действий. Может применяться при вводе текста, в играх, обычной работе в операционной системе.
Скрипты могут иметь графический интерфейс для показа информации и ввода настроек.
У AutoHotkey очень развитый скриптовый язык, но вам необязательно его изучать — вы можете воспользоваться готовыми скриптами.